I really like my Raspberry Pi and my Sense HAT and was wondering if the open-source weather station software WeeWX would work with that setup. The software is written in Python and runs on all Linux distributions. Raspbian is based on Debian and the software can be installed very well on the official operating system for the Raspberry Pi.
In this article I will show you step by step how to build your own weather station with a Raspberry Pi, a Sense HAT and WeeWX. It’s easier than it looks at first glance, I promise!
Officially WeeWX supports several weather stations (hardware), but Sense HAT is not included. However, there is an extension called FileParse, which you can install optionally. So, you don’t use the data of a hardware weather station directly, but read a file with the needed values inside. With a Raspberry Pi and a Sense HAT we can create a file with temperature, air pressure and humidity.
I want to point out that my setup is a proof of concept, but it was really fun. The Raspberry Pi is hanging in my room with the Sense HAT attached to it. I don’t know yet if I will put it into a case and move it to the outside. I also like to play with the Sense HAT otherwise. With a Raspberry Pi you can not only build a weather station. There are many other exciting projects you can build.
What do you need for the weather station with Raspberry Pi and Sense HAT?
The software doesn’t need a lot of processing power and also runs on older Raspberry Pis. You need access to the GPIO pins to connect the Sense HAT. If you plug the Sense HAT directly into the Pi, the temperature will be a bit higher. Therefore, it is a good idea to connect the Sense HAT for the weather station with a ribbon cable and move it further away. This will look like this in something like this:
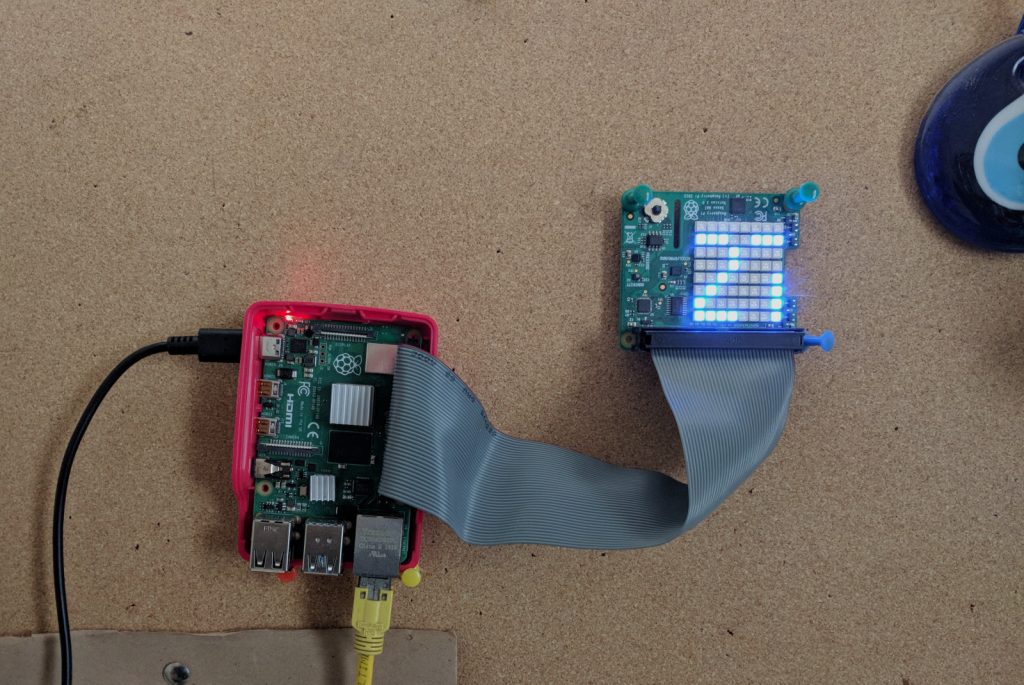
To move the Sense HAT further away with a ribbon cable, a few steps are necessary. But it’s not too complicated. For the proof of concept you can just stick the HAT onto the Pi and decide later what to do.
In any case the following components are recommended if you want to recreate the project:
- Raspberry Pi with easy access to the GPIO pins — the project doesn’t need much power and a Pi 4 might be a bit over the top. OK, the reports are created faster with it — you have to decide yourself which hardware you want to use for the project.
- A case certainly can’t hurt either.
- Sense HAT — obviously (if you don’t have one but still want to follow the instructions you can consider using the Sense HAT Emulator)
- microSD card — 16 GB should be enough (actually 8 GB are enough, but you hardly get them anymore).
- Power supply — the power supply depends on the Pi.
- Optional: Keyboard, mouse and screen to set up the Raspberry Pi if you don’t choose to go the headless way.
[su_service title=”Raspberry Pi 4 and Sense HAT” icon=”icon: lightbulb-o”]If you use a Raspberry Pi 4 headless and have a Sense HAT attached, the system may not start. You need to enable hdmi_force_hotplug=1 in the file config.txt that you find on the boot partition of the microSD card. Otherwise, the Pi 4 may not start-[/su_service]
Raspbian Lite is good as operating system
Since we will access the weather station later via web browser, we do not need a Raspbian with a GUI. Raspbian Lite is completely sufficient. You can download Raspbian Buster Lite from the website of the Raspberry Pi Foundation.
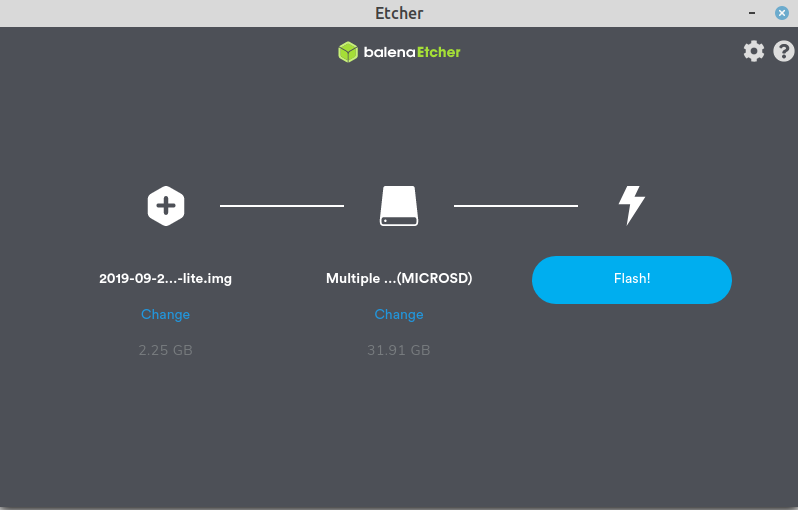
To copy the operating system to the microSD card, I use Etcher. The software runs on Linux, macOS and Windows. The installation is straightforward:
- Insert your microSD card into your computer
- Start Etcher
- Select the image (Raspbian Buster Lite)
- Choose the destination — i.e. your microSD card
- Click on Flash! (on Linux you will be asked for your password, so you need root privileges)
The installation takes a few minutes. After you have installed Raspbian Buster Lite, insert the microSD card into your Raspberry Pi and start the SBC.
Start and configure Raspbian
In this case it does not really matter which IP address the Raspberry Pi gets. Still, it is nice if you don’t have to guess when systems reboot. That is why I have set up my Raspberry Pi with a static IP address. However, it is not stored in the Pi, but in the DHCP server, i.e. in the router. As I said, this is not relevant, but I wanted to mention it.
As a first step I, would recommend changing the password of the user pi. It is raspberry by default. This step is optional, but since the weather station is most likely accessible via network, it is not very secure. If you are on the command line, just change the password with the command:
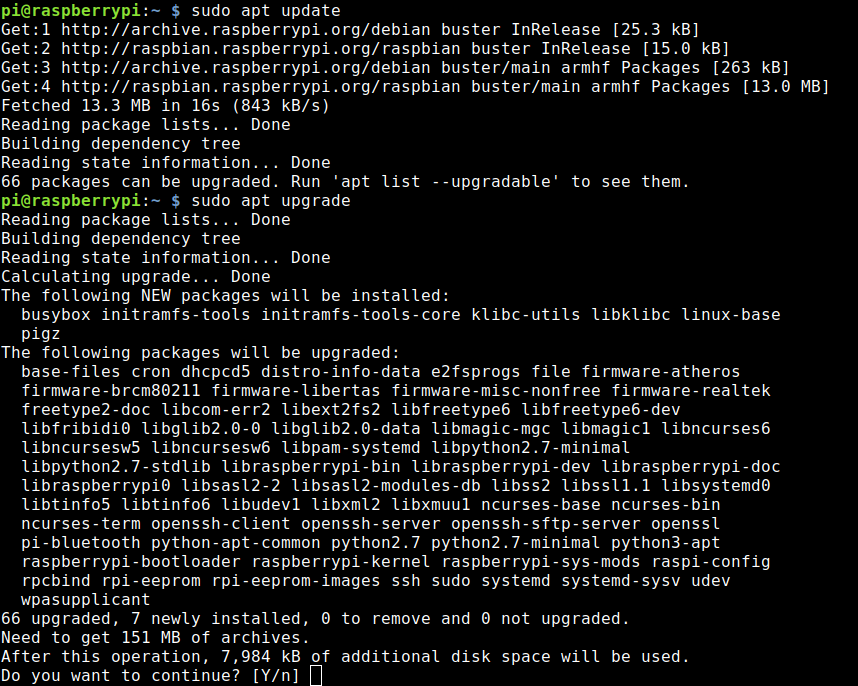
passwdIt is best to update the system afterwards:
sudo apt update
sudo apt upgrade
Depending on your internet speed and which Raspberry Pi you use, this may take a while.
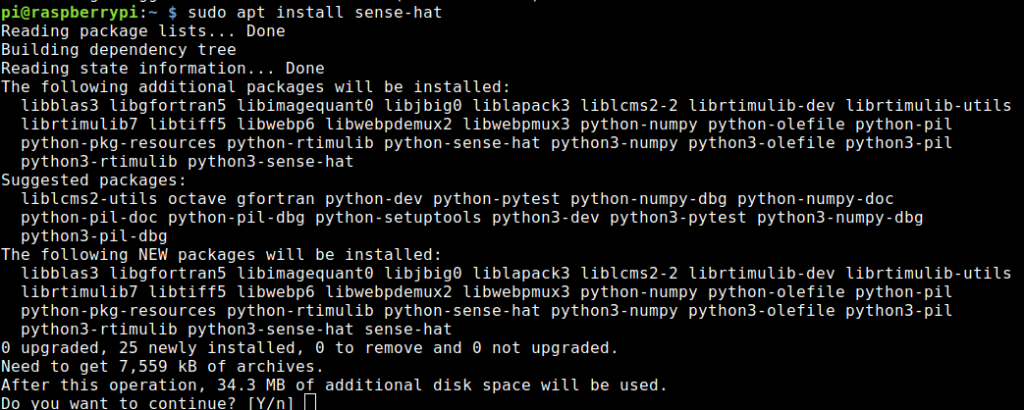
Then you install the necessary packages to be able to address the Sense HAT. Without getting data from it the weather station is somehow pointless.
sudo apt install sense-hatThere are some dependencies, but the package manager of Raspbian takes care of that. This is nice and handy.
Now we reboot the system:
sudo rebootInstall a web server on the weather station
We need a web server so that you can view the weather station reports in your browser. WeeWX creates reports in web format, which a web server then displays in the browser. You could also have the reports transferred to another computer with a web server. I will show you how to do this later. For now, we keep it compact and everything on the Raspberry Pi.
Whether you install Apache or Nginx or a completely different web server is up to you. I just take Apache because of habit. That’s what I know best. Of course, you can configure your router later so that you can access Raspberry Pi from the Internet. If you plan to do so, you definitely should change the password of the user pi (if you also open SSH). You only need one command to install the Apache web on the Raspberry Pi:
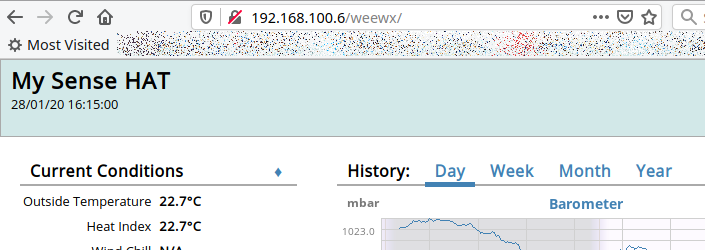
sudo apt install apache2You can check if the web server is working by using the IP address of your Raspberry Pi as URL in your browser. In my setup that is 192.168.100.6. It works.

By default, the web server uses /var/www/html/ as path. The weather station software later creates the reports in the folder /var/www/html/weewx/ by default in Debian / Raspbian. This is convenient because we do not have to configure the web server separately. Of course, if you want to use a domain or subdomain with a certificate from Let’s Encrypt, things get more complex. But details about this would go beyond the scope of this article.
Install the WeeWX weather station software on the Raspberry Pi
After Sense HAT and web server are working, the heart of the weather station is missing. This is the software WeeWX. The developers make the installation on a Raspberry Pi straightforward. You only have to execute the following 4 commands on your Pi.
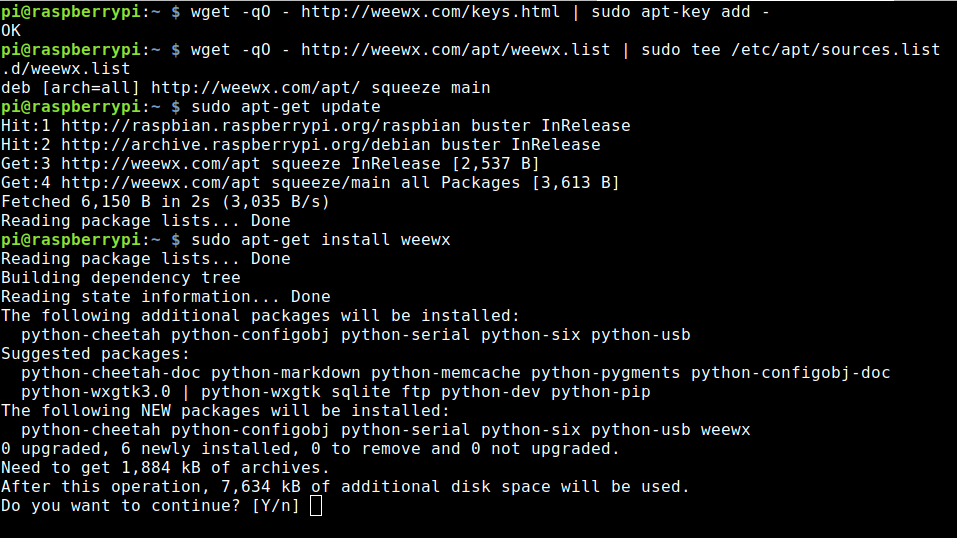
wget -qO - http://weewx.com/keys.html | sudo apt-key add -
wget -qO - http://weewx.com/apt/weewx.list | sudo tee /etc/apt/sources.list.d/weewx.list
sudo apt-get update
sudo apt-get install weewx
It looks like that:
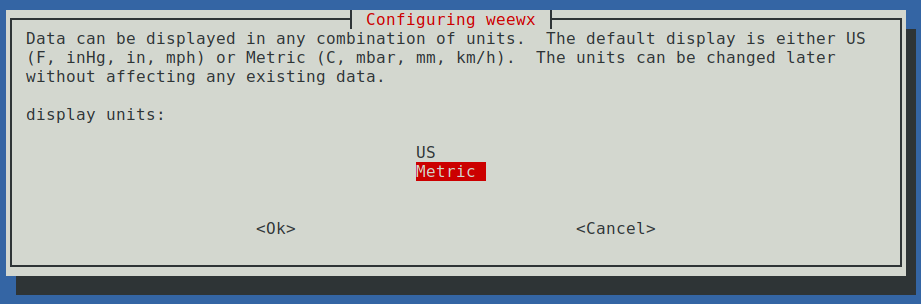
During installation, WeeWX wants to know some details. You may give your weather station a name. The installation process also asks for latitude and longitude. The software also wants to know how many meters above sea level your Sense HAT is.
When choosing between Metric and US, I prefer metric. But there are a few inconsistencies, which I will explain further below.
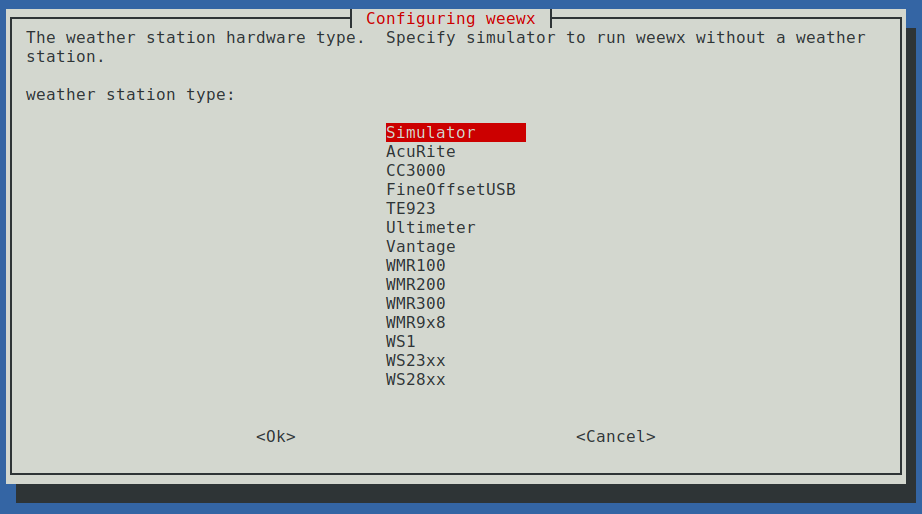
Now you select which hardware WeeWX should use. Since we are not yet transferring the data from the Sense HAT, we will first use the Simulator. With that we can at least test if the weather station works.
The installation and first configuration are now finished. By default, the weather station creates a new report every 5 minutes. Therefore, wait at least 5 minutes and then open the URL http:<ip-address-of-your-Pi>/weewx/. The simulator should have provided a bit of data already. If the report is not yet created, you see a 404 error (not found).
I would wait for the first report if I were you. This will ensure that the configuration works so far. If there are any problems, the troubleshooting is easier.
Install and configure WeeWX FileParse
We will later create a text file with data that we gather from the Sense HAT. As mentioned above, WeeWX must be able to read and process the file. There is an extension for this, called FileParse. But you have to download and install it first. I assume that you are in the folder /home/pi/. Download the necessary file:
wget -c https://github.com/weewx/weewx/archive/master.zipand extract it:
unzip master.zipWith that command you have created a folder called weewx-master. Now you can install FileParse:
sudo wee_extension --install=/home/pi/weewx-master/examples/fileparse/After that you reconfigure WeeWX:
sudo wee_config --reconfigureYou can accept all settings as they are and simply confirm them with the Enter key. For the driver you now use FileParse — it’s option 0.
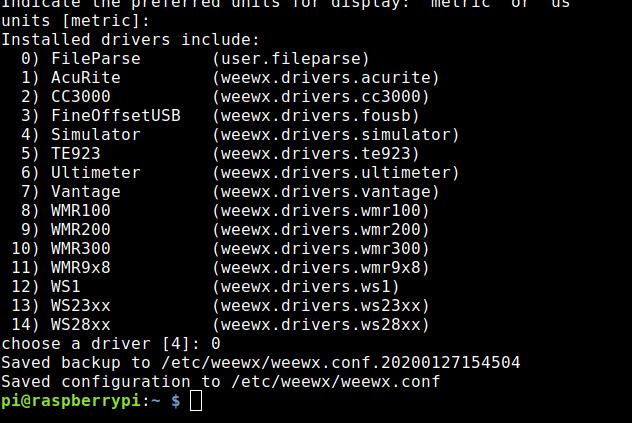
The file the weather station should read from is stored in the parameter path in the configuration file /etc/weewx/weewx.conf in the section FileParse.
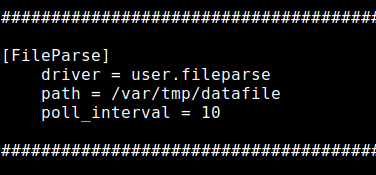
You see that in my case the file /var/tmp/datafile (the default) is parsed every 10 seconds. You can customize this as you like.
Create a text file with data from the SenseHAT
I found the tip with the FileParse in this article. There you can also find several files with Python code to create the file with the needed values. That are temperature, air pressure and humidity. But I have adapted the script. The author has not moved his Sense HAT away from the Pi. The HAT is therefore close to the CPU and the temperature is higher than the actual ambient temperature. Therefore, he uses corrected data. I did not do that. My file weewx.py looks like this:
#!/usr/bin/python
from sense_hat import SenseHat
import time
import sys

sense = SenseHat()
sense.clear()

f = open('/var/tmp/datafile', 'w')

temp = sense.get_temperature()
temp = ((temp/5)*9)+32 #Change to Fahrenheit
temp = round(temp, 1)

hum = sense.get_humidity() #first reading sometimes 0
time.sleep (2)
hum = sense.get_humidity() #we read againt besser
hum = round(hum, 1)

pres = sense.get_pressure()
pres = 0.02953 * pres # Change to inHg
pres = round(pres, 3)

f.write ('outTemp=')
s = str(temp)
f.write (s)
f.write ('\n')
f.write ('outHumidity=')
s = str(hum)
f.write (s)
f.write ('\n')
f.write ('pressure=')
s = str(pres)
f.write (s)
f.close()
You can download my file here so you don’t have to create it.
[su_service title=”outTemp, outHumidity und pressure” icon=”icon: lightbulb-o”]You can also find those parameters in the file /etc/weewx/weewx.conf. They are assigned to the outdoor temperature, humidity and pressure in the software. It is no coincidence that the parameters are chosen that way.[/su_service]
Now we want to execute the script in regular intervals. WeeWX reads the file every 10 seconds, but I decided that it is enough to gather data from the Sense HAT every minute. I can use a cronjob for that. It doesn’t really matter how you create the file. You can also run the script manually, but that will be a little annoying at night. 🙂
I let a cronjob do the work. For this I open the crontab:
crontab -eand enter the following line:
*/1 * * * * /usr/bin/python /home/pi/weewx-bb.py >> /dev/null 2>&1It looks like that:

Since the simulator has already written data to our database, you may want to reset WeeWX. I did this to avoid having strange data in my records.
Reset WeeWX — where is the database?
There can be several reasons to reset the weather station. You do not need to uninstall the software for this. It is actually enough to delete the database. But for this you need to know where it is. It is located in the folder /var/lib/weewx/. I have stopped WeeWX, deleted the database and started the weather station again. This created a new and empty database.
Careful! The command clears without confirmation:
sudo /etc/init.d/weewx stop
rm -f /var/lib/weewx/weewx.sdb
sudo /etc/init.d/weewx start
A slightly softer approach would be to move the database and not delete it. But as I said, this is a test, and I didn’t care about the data. However, the location of the database is important for another action — data backup!
Backup of the weather station!
If we know where the database is, we can back it up. The best time to back up a database is when the software is not performing a transaction. This means that ideally you stop weewx during a backup and restart it afterwards.
In the documentation the following folders and files are given for a complete backup if we installed the .deb file on a Raspberry Pi:
- Database: /var/lib/weewx/weewx.sdb
- Configuration file: /etc/weewx/weewx.conf
- Skins (if you have made adjustments): /etc/weewx/skins/
- Custom code or extensions (like fileparser.py): /usr/share/weewx/user/
It’s up to you which files you want to back up. The extensions can be reinstalled and if you did not make any adjustments to the skins, a backup of the folder is actually obsolete.
Adjust the skin of the weather station
The skins are important because they are used to create the report. With them the software determines what you see in the browser. By default, WeeWX creates its report using the skin Seasons. If you have chosen the installation method described here, you can find it in /etc/weewx/skins/Seasons/.
You don’t have to change anything if you don’t feel like. However, your report will show you some fields for which the Sense HAT cannot provide data. It is really a purely cosmetic problem.
Now you could create your skin, for example by copying Seasons and then let your creativity run wild. Afterwards, you tell the software in the configuration file weewx.conf to use your template.
Personally, I took a much more pragmatic approach and simply commented out the lines that are not needed.
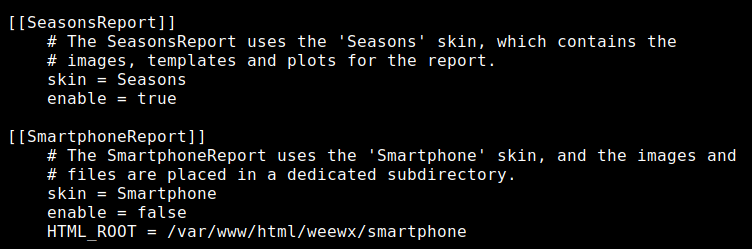
The section I am talking about looks like that now:
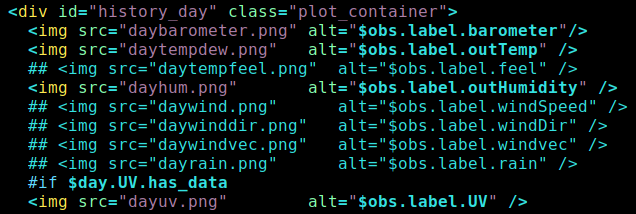
Now the weather station is better suited for the Sense HAT and there are less empty fields:
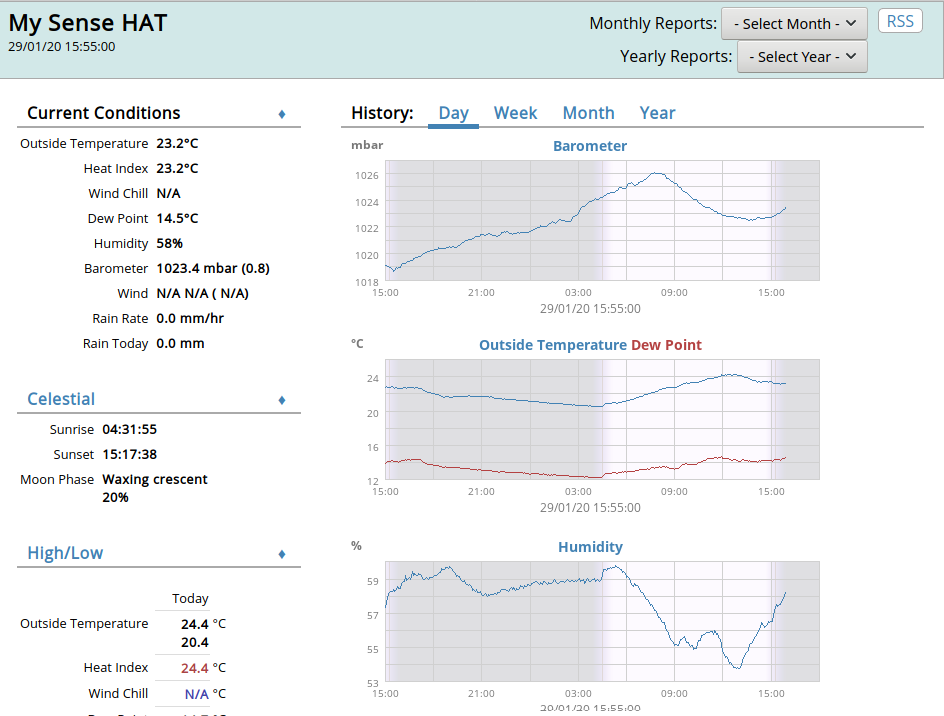
Be aware because the graphics also appear in the week, month and year sections. As I said, this is a cosmetic thing and you will know yourself how your weather station should look like.
Which skins are created?
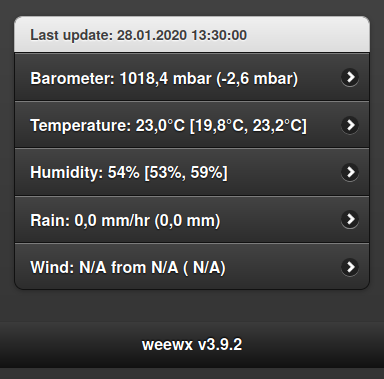
In the configuration file /etc/weewx/weewx.conf there is a section called [StdReport]. There you can see which skins are created and which are not. Take a look at the following screenshot. The default report, Seasons, has the parameter enable set to true. This means it will be created in the above mentioned directory /var/www/weewx. If you set the SmartphoneReport that uses the skin Smartphone to enable = true, you will get another report in /var/www/html/weewx/smartphone.
It looks like that:
It’s clear how that works, isn’t it?
The special skins FTP and RSYNC
There are also the two skins [[FTP]] and [[RSYNC]]. With these you could have the report transferred to another computer with a web server installed. In my case this is not necessary because the web server is running on the Raspberry Pi, on which the Sense HAT is also plugged in. I just wanted to mention it for completeness. If you transfer the report to another server, you don’t need to install a web server on the Pi, of course.
One more idea! Since we create a text file with the data gathered from the Sense HAT, the whole weather station WeeWX doesn’t have to run on the Raspberry Pi. You can install it on a completely different computer and then copy the text file at regular intervals. This might be useful if you have the Sense HAT plugged into a Pi Zero W and really only want to get the data from the Sense HAT. The extension FileParse doesn’t really care where the sensor is — it is only interested in the text file.
Are there any other skins?
Yes, but you have to look for them a little. I think it’s a pity that there is no wiki where all the individual skins are stored. Or did I just miss it?
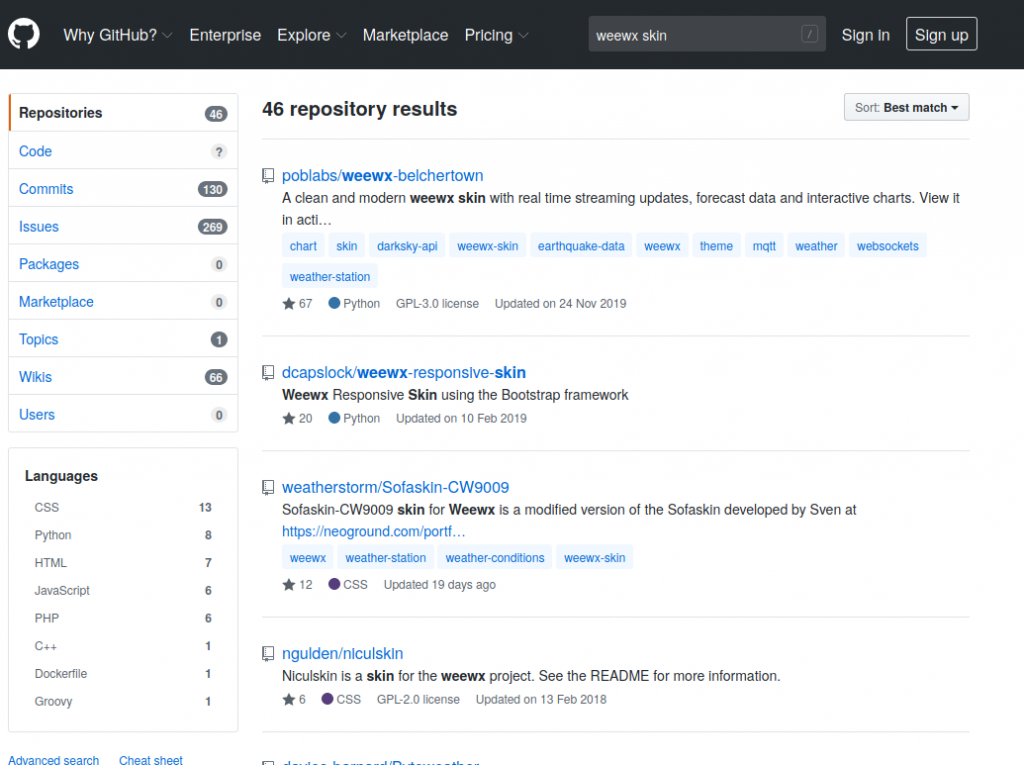
In any case, the easiest way to find a new skin is to search for weewx and skin on GitHub.
Some include installation instructions, others do not. In any case, you know from which directory the weather station gets the skins (/etc/weewx/skins).
Teach the weather station a different language
If you want your weather station to speak a different language, you can adjust the names. In the section [StdReport] → [[Defaults]] → [[[Labels]]]→ [[[[Generic]]] you will find the necessary labels. Change them for example:
outTemp = Outside Temperature
to
outTemp = Your Language Temperature
After the change you restart the daemon:
sudo /etc/init.d/weewx restartNow the report is created with a different label for the outside temperature.
You can also register your weather station with Weather Underground and send data to them. How this works is described in the documentation.
What I don’t quite get is…
The documentation is very extensive. Either I have overlooked something or I don’t quite understand one thing.
I can’t find an option in the configuration file weewx.conf that determines which formats I send to the weather station on the Raspberry Pi. From the Sense HAT I get the temperature in °C (Celsius), but the weather station WeeWX apparently expects Fahrenheit. I can specify in the configuration file that I want to have the temperature in Celsius in the report. Then the system converts the value correctly, but I input Celsius directly.
I have the same problem with the air pressure. The system expects inHg and the Sense HAT provides mbar. In the graphical report I can specify that I want the software to show mbar. But first I have to convert the value of the Sense HAT. Maybe there is no other way.
With the humidity the question does not arise and there is no problem.
I have to admit that I had a hard time with this conversion thing in the beginning. But at some point I accepted that I transmit Fahrenheit as temperature and inHg as air pressure. It seems to work and I try not to think about it any further (it still bothers me 🙂 ).
A lot of possibilities
WeeWX offers many options. If you want to build a weather station with the Raspberry Pi and Sense HAT, start slowly. Get the thing working and then move slowly forward. That is my advice.
I tried to change too many things in too many places in the beginning and got lost. Of course, you want to customize everything concurrently, but that was counterproductive for me.
As I mentioned in the beginning, it’s really fun to experiment with WeeWX. Maybe I’ll actually buy a compatible hardware weather station that I can install outside.
Do you like to tinker with the Raspberry Pi? Here is one more idea …
Do you also like to experiment with your Raspberry Pi? I have another exciting project for you, which is not more difficult than setting up your own weather station with a Sense HAT on the Raspberry Pi.
With RaspAP you can also turn the Raspberry Pi quickly into an access point or hotspot. No complicated configuration is necessary, all this is done by the excellent project RaspAP. Once you have turned your Raspberry Pi into an access point, it is only a small step to your Raspberry Pi VPN router. How to do that? I explain everything step by step in this article.
Once that is up and running, you can connect devices to a VPN even if there is no native client. Examples would be Smart TVs or a Chromecast. You can even control how much bandwidth is available to the devices by throttling the connection yourself with wondershaper. In the end, you can control how much bandwidth a streaming app can use.
Jack Pan
says:Hello,I want to know where should I commented out what I don’t need? I means which file should be fixed?
And, I have successfully set the station to use FileParse,but my website still show me the data from simulator,how to fix it?
guyfawkes
says:I am not sure if I fully understand the question – sorry …
David
says:I’m bothered by the store everything in imperial by default approach also. My sensors are sending data in C, then Weewx gets it, converts it to F, stores it in the database in F and then every 5 minutes extracts the data in F, converts it back to C and uses that to generate images and statistics.
To address this definitively, you need to edit the target_unit value in [StdConvert] to “METRIC” or “METRICWX” . . . and then follow your steps in your section “Reset WeeeWX” again to nuke whatever data was already in there and just start recording metric values. Technically Weewx says it doesn’t matter what unit you use in the DB since the reports allow you to display any value type you want, but it makes no sense to convert and then reverse the process to leave you back where you started.
##############################################################################
# This service acts as a filter, converting the unit system coming from
# the hardware to a unit system in the database.
[StdConvert]
# The target_unit affects only the unit system in the database. Once
# chosen it cannot be changed without converting the entire database.
# Modification of target_unit after starting weewx will result in
# corrupt data – the database will contain a mix of US and METRIC data.
#
# The value of target_unit does not affect the unit system for
# reporting – reports can display US, Metric, or any combination of units.
#
# In most cases, target_unit should be left as the default: US
#
# In particular, those migrating from a standard wview installation
# should use US since that is what the wview database contains.
# DO NOT MODIFY THIS VALUE UNLESS YOU KNOW WHAT YOU ARE DOING!
target_unit = US # Options are ‘US’, ‘METRICWX’, or ‘METRIC’
Hugo
says:I didn’t get why you use the file “weewx.py” first, then later you setup your crontab with the file “weewx-bb.py”
guyfawkes
says:That was just a modification of my first file … it’s just a different name so it doesn’t matter. Just put here how you named your file and you are good to go. Sorry for the confusion.