Canonical has officially certified Ubuntu 20.04 LTS Focal Fossa for the Raspberry Pi, I want to know more about it. Let’s install the Linux distribution on the Pi and see how well it works.
First of all you need to know that Ubuntu 20.04 is only available for the Raspberry Pi versions 2, 3 and 4. Then there is a 32-bit and a 64-bit version. Starting with Raspberry Pi 3, you can install the 64-bit version. The 32-bit version runs on all officially supported Pis.
What you need
For the test I used a Raspberry Pi 4 and the 64-bit version. Furthermore, there were a few other components in use, some of which are part of my standard equipment:
- Raspberry Pi 2, 3 or 4
- microSD card (you can hardly get smaller than 16 GB anyway)
- Power supply (I always use the official power supplies)
- Case for the Raspberry Pi (optional — but recommended)
Now it depends on whether you access Ubuntu for the Raspberry Pi completely headless or use the device on a screen. If this is the case, you will need additional hardware:
- Keyboard / mouse (optional Logitech with touchpad)
- For Raspberry Pi 4 a HDMI adapter
If you do not have any hardware yet, we recommend that you purchase a kit or complete package. This includes everything you need except for the mouse, keyboard and screen.
Install Ubuntu 20.04 on a microSD card
The easiest way to install Ubuntu 20.04 on a microSD card is the Raspberry Pi Imager. You can download it from the Raspberry-Pi-Website. It is available for Ubuntu (also Linux Mint), Windows and macOS.
Important: Installing Ubuntu 20.04 on the microSD card will erase all data on the flash drive. So make sure that there is no important data on it. If this is the case, a backup is recommended.
After downloading the Raspberry Pi Imager, insert your microSD card into your computer and start the tool. Now choose which version of Ubuntu 20.04 you want to install.

Furthermore, you choose the SD card — if there is only one plugged in to the computer, the choice should not be difficult. Then click on Write and the installation process begins. Depending on your internet speed, the download will take a few minutes.
First configuration steps for Ubuntu 20.04 on the Raspberry Pi
Before the first start you can already prepare the Raspberry Pi with Ubuntu 20.04 This is recommended, especially if you want to connect the device to the network via Wi-Fi.
Wi-Fi or Ethernet cable
The first question will be whether you want to connect the Raspberry Pi to the network via Wi-Fi or Ethernet cable. With a cable, this is easy because you don’t have to do anything else.
If you want to configure the Raspberry Pi with Ubuntu 20.04 for wireless networking before the first boot, a small configuration step is necessary.
Let’s assume the microSD card is still in your computer, look for the partition system-boot. If necessary, you have to eject the disk and plug it in again. The partition contains configuration files that are loaded during the first boot. This is similar to configuring Raspbian for headless use.

On the partition you will find a file network-config. Open it with a text editor and you will see that the developers provide examples.
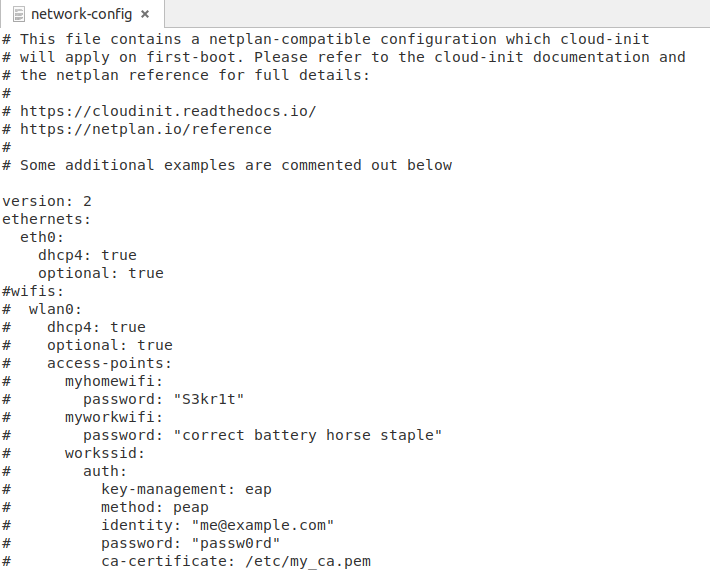
You can remove the comments # and enter your values. For example:
wifis:
   wlan0:
      dhcp4: true
      optional: true
      access-points:
        Springfield:
        password: "topsecret"
Important: If your Wi-Fi network name contains a space, you must enclose the name in quotation marks: “My Wi-Fi Name”.
You can also change the network settings later by editing the file /etc/netplan/50-cloud-init.yaml.
In my case, the Wi-Fi didn’t work right away because the system didn’t put quotation marks in the password in the file 50-cloud-init.yaml. Now I had to do that myself and save the file. After another reboot Wi-Fi was working as it should.
That didn’t work as smooth as expected.
Booting Raspberry Pi with Ubuntu 20.04 LTS
Now insert the microSD card into your Raspberry Pi and start the system. The boot process does not take long with a Raspberry Pi 4.
Important: Username and password are ubuntu by default (both the same).
When you log in for the first time, the system will immediately ask you to change your password. This is really useful because the SSH server is activated by default. If you don’t change the password, everyone on the same network can access your Raspberry Pi.
Be careful at this point, though because the keyboard settings are US. You may want to set a simple password, change the keyboard settings if necessary and then use a password that matches your keyboard.
Change keyboard settings on Ubuntu 20.04 Server
After starting and changing the password, changing the keyboard layout was my next step. Otherwise this would drive me crazy. Use the command on the console:
sudo dpkg-reconfigure keyboard-configurationFollow the instructions to change your keyboard layout — it’s easy. After you are done reboot the system or the following command might do the trick:
sudo setupconNow I have a keyboard layout I can work with.
Changing the time zone
You should also be aware that the timezone is set to UTC. If you want to change that as well use the following command:
sudo timedatectl set-timezone <your-timezone>Now you can check with date whether this has worked or not.
Access Ubuntu 20.04 for Raspberry Pi via SSH
If you know the IP address of your Raspberry Pi, you can access it via SSH. As mentioned above, the SSH server is installed and activated by default.
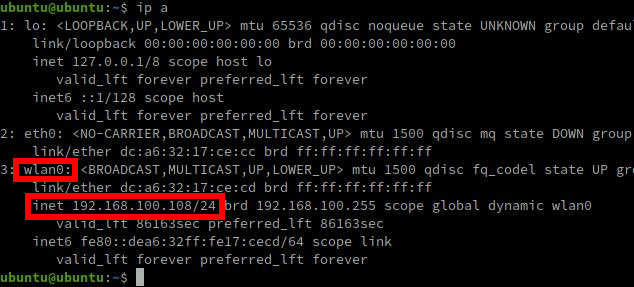
If you have a mouse, keyboard and screen connected, you can find out the IP address with this command:
ip aYou can also check your router or DHCP server to see what IP address is assigned to the Raspberry Pi. You may want to give a static IP address to a server anyway. I always do this via DHCP server because the IP address is then bound to the MAC address. Even when I install a new operating system, I know what IP address the device has. Just as a thought.
ssh ubuntu@<IP address of the Raspberry Pi>The first time you access it, you must confirm access to Ubuntu 20.04 for Raspberry Pi. This is like all SSH connections, as you know.
Update your system to the latest version
After logging in, the system also reported that there are updates for 5 packages.

Good to know, we install the updates quickly:
sudo apt upgradeAfter Ubuntu 20.04 for Raspberry Pi is up to date, I install a desktop environment out of curiosity.
Install a Desktop environment
You have the possibility to install a desktop environment. You can choose between Xubuntu, Lubuntu and Kubuntu, i.e. Xfce, LXQt and KDE.
sudo apt install xubuntu-desktop
sudo apt install lubuntu-desktop
sudo apt install kubuntu-desktop
For the test I was pragmatic and just took Xubuntu or Xfce. Even on a Raspberry Pi 4 it takes a while to install a graphical desktop environment. Time for a coffee.
Once the installation is complete, simply reboot your Raspberry Pi with Ubuntu 20.04 LTS Focal Fossa. The graphical desktop environment will start automatically.
The system will also install various desktop applications such as Firefox, Thunderbird, LibreOffice, Pidgin and GIMP.
It’s no fun — seriously
This is not yet running smoothly at all. So, when I logged in, the system logged me into GNOME, the normal Ubuntu environment. I had to manually switch to Xfce. After that I was greeted with an error message (although I had left the preselection gdm3 as display manager).

The error no longer occurred after I switched to lightdm instead of gdm3:
sudo dpkg-reconfigure lightdmHowever, Ubuntu 20.04 gave me a strange screen resolution with both the display managers and I can’t change it. My screen would actually support 1920×1080 pixels.

There are also graphical glitches like black screen and only the mouse pointer shows up. Manjaro works better on the Raspberry Pi as a desktop. But I still stick to the fact that Raspbian is the best desktop environment for the Raspberry Pi, especially if you want to tinker with the Pi.
The Ubuntu GUI on a Raspberry Pi 4 also feels slow and Raspbian on a Pi 2 feels similarly fast. This is simply no fun.
I just put Ubuntu 20.04 LTS Server on the microSD card again and started from scratch. The Ubuntu 20.04 desktop on the Raspberry Pi is not good right now. If you really want to run Ubuntu 20.04 as a desktop on the Raspberry Pi, you better wait for Ubuntu MATE 20.04 — my opinion.
Install WireGuard Tools
If you are interested in Linux and VPNs, you know that the VPN protocol WireGuard was included in the Linux kernel 5.6 and backported for the Ubuntu kernel (5.4). This means you can easily install WireGuard from the repositories.
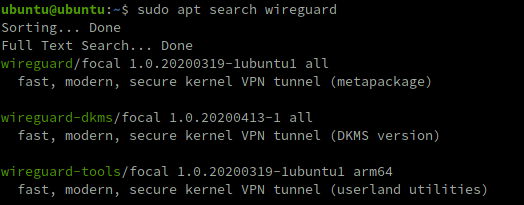
This makes it easier to install WireGuard than under Raspbian, should you want to build a WireGuard server with your Ubuntu 20.04 on the Raspberry Pi.
sudo apt install wireguardBy the way, RaspAP also supports Ubuntu, but currently only officially 18.04 and 19.10. I haven’t tried to make a hotspot out of Ubuntu 20.04 LTS for Raspberry Pi.
If you are searching a VPN for the Raspberry Pi I recommend NordVPN (big discounts NOW)* because they provide a native client. They also give you the possibility to use WireGuard — NordVPN calls it NordLynx.
Nathy
says:Hi,
May I ask a question that I encountered?
My Raspberry Pi is “3B+”. When I followed your steps to install a desktop environment, it always gave me this error:
“Failed to fetch http://ports.ubuntu.com/ubuntu-ports/pool/universe/b/breeze-icons/breeze-icon-theme_5.68.0-0ubuntu1_all.deb” Connection failed [IP: 91.189.88.150 80]”
I’ve tried these two:
sudo apt install xubuntu-desktop
sudo apt install kubuntu-desktop
How can I solve it?
Thanks so much
guyfawkes
says:I just checked and the package is definitely available. Connection failed sounds like a network error. You can try a manual update again:
sudo apt update
Or try to download the package where you get the error for and copy it manually to /var/cache/apt/archives
Angela
says:Try connecting with an ethernet cord to do the desktop install.
William
says:Default password ubuntu/ubuntu did not work for me… tried pi/raspberry…kind of strange…