WireGuard will officially be included in the Linux kernel 5.6. Ubuntu 20.04 LTS Focal Fossa will not use the kernel upon release, but will still implement the lean VPN protocol WireGuard by default. This is great news. Up to now, however, installing the protocol in Ubuntu has been easy, as there is a so-called PPA. Besides, from Ubuntu 19.10 you find it in the Universe repository. Since access to the VPN protocol is so easy, I’ll show you how to set up a WireGuard VPN server yourself and connect to Linux and Android as a client. I will show you how to install it first on a VPS with Ubuntu 18.04 and then on a Raspberry Pi with Raspbian.
[su_service title=”Configuration is amazingly simple!” icon=”icon: lightbulb-o”]It may not look like it at first glance, but the installation and configuration of a WireGuard VPN server is relatively simple compared to the existing alternatives. You can also test it with your internal network if you like. The VPN doesn’t care if the tunnel is established in the LAN or via Internet. All you need is a Linux computer as server (Raspberry Pi) and a client and you can test it.[/su_service]
In a quick walkthrough, the setup of the WireGuard VPN server looks like this:
- Install WireGuard on the device you are using as server
- Enable IP forwarding on the server
- Create encryption keys on the server
- Activate WireGuard interface
- Install software on the client
- Create encryption keys on the client
- Allow the client to dial into the server
- Activate the VPN connection on the client
Are you ready? Step by step with Ubuntu and Raspbian on a Raspberry Pi as server.
The requirements for my WireGuard VPN Server
You will agree with me that there are many combinations of clients and servers. Therefore, I have to limit myself to setups that are feasible for most people.
- My WireGuard VPN Server is a VPS (Virtual Private Server). You get good and cheap ones €3.99 per month. This is my dial-in node or server to which I have root access. But I also show you how to use a Raspberry Pi as a WireGuard VPN Server.
- One client will be a current Linux Mint. The installation works the same for Ubuntu. In fact, the commands are the same for all Linux distributions that can install WireGuard. This also applies to the Raspberry Pi.
- My other client is my smartphone running Android.
- The setup is very similar for all clients. Visit the developers’ installation section and you will find many instructions and download links. There are guides for Windows, macOS, Fedora, Red Hat Enterprise Linux, openSUSE, Arch, FreeBSD and so on, among others.
- For the clients I’ll show you how to activate an ad-blocker and tracker-blocker.
[su_service title=”So many different ways” icon=”icon: lightbulb-o”]With Linux there are many ways to achieve the same result. I show you one option. If you are used to other tools and ways, just adapt the post to your liking.[/su_service]
Installing WireGuard on Ubuntu
With Ubuntu and its derivatives like Linux Mint, it depends on which version you have. Starting with Ubuntu 19.10 all you need is:
sudo apt install wireguardBut I only run LTS versions on my VPS, I have to use the PPA provided by the developers. But it is not much more complicated. Instead of one you need three steps and on Ubuntu 18.04 you don’t need the second one:
sudo add-apt-repository ppa:wireguard/wireguard sudo apt-get update sudo apt-get install wireguardNo additional software for server or client necessary
I want to point out that you don’t have to install any special software for server or client. Once WireGuard is installed, you can use it to turn any device into a dial-up node or a server. With OpenVPN you need a server software that has to be installed and configured separately. The server software differs from the client software. This is not the case with WireGuard.
Once the software is installed, you can use the commands shown here to allow other computers to establish the encrypted tunnel.
Install WireGuard on a Raspberry Pi
If you want to choose a Raspberry Pi (2 version 1.2 and higher) as the server, a little more manual work is necessary. But it is not complicated. The manual on the project page is only partially useful because important steps are left out. I will show you how to get WireGuard installed under Raspbian Buster and skip Stretch. I execute all commands as root. First, make sure that your Raspbian is up to date:
apt update
apt upgrade
Then we have to install the kernel headers:
apt install raspberrypi-kernel-headersThe next 4 steps can be found in the installation instructions of the WireGuard developers for Debian. We just need one additional step. The third command imports a signature for a Debian archive. Without this step, the update will fail:
echo "deb http://deb.debian.org/debian/ unstable main" > /etc/apt/sources.list.d/unstable.list
printf 'Package: *\nPin: release a=unstable\nPin-Priority: 90\n' > /etc/apt/preferences.d/limit-unstable apt-key adv --keyserver keyserver.ubuntu.com --recv-keys 04EE7237B7D453EC
apt update
apt install wireguard
The VPN protocol is now installed. Let’s activate the so-called IP Forwarding right now because we need it.
Enable forwarding under Ubuntu and Raspbian
Simply put, IP Forwarding ensures that all packets that impact the WireGuard interface are forwarded. For both Ubuntu and Raspbian, the easiest way to do this is to edit the file /etc/sysctl.conf. The relevant entries are already in the file, you only have to remove the comment sign — remove the hash at the beginning of the line.
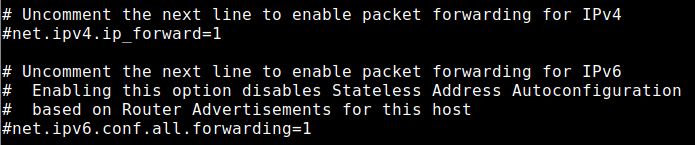
If you don’t want to search for the two lines, you can insert these two lines at the end of the file:
net.ipv4.ip_forward=1 net.ipv6.conf.all.forwarding=1Save the file afterwards. Then restart the system or activate the configuration by using the command:
sysctl -pYou can also check if IP Forwarding is enabled:
sysctl net.ipv4.ip_forward
Note: For older Pi versions and a Raspberry Pi Zero W you would have to compile yourself. It is not complicated, you can find a manual here.
Generate encryption keys on the WireGuard VPN server
The VPN protocol works similar to SSH with the exchange of encryption keys. There is a private key and a public key. The private key is top secret and the public key is — well public. The principle is well known. But we have to generate these keys first (as root):
cd /etc/wireguard
umask 077
wg genkey | sudo tee privatekey | wg pubkey
Now you find two new files in the directory /etc/wireguard called privatekey and publickey.

You don’t have to do more at this point with the keys. For security reasons, you can also really secure the file privatekey:
chmod 600 /etc/wireguard/privatekeyIn my case this would not be necessary, as you can see in the screenshot above, but better safe than sorry — the command doesn’t hurt.
Setting up the server
Now the fun begins. We need to create a network interface that routes all traffic. The first network interface for this purpose is usually called wg0, but it doesn’t have to be. You can call it whatever you want. But I stick to the standard to keep things simple.
The interface wg0 serves as router. Which is why we need a subnet for our VPN. The network should not interfere with your actual network. The IP addresses should be different. If they are not, conflicts will occur and in the worst case the thing will not work at all. Therefore, I take a network that most people probably don’t use (but this is just an example!): 192.168.206.1/24. With this I get the IP addresses from 192.168.206.1 to 192.168.206.254. This is enough for me.
Since we call the interface wg0, we create the configuration file /etc/wireguard/wg0.conf. Don’t worry, I will explain the most important lines.
[Interface]
PrivateKey = <your private key>
Address = 192.168.206.1/24
Address = fddc:980e:a378:05c2::/64
SaveConfig = true
PostUp = iptables -A FORWARD -i wg0 -j ACCEPT; iptables -t nat -A POSTROUTING -o ens18 -j MASQUERADE; ip6tables -A FORWARD -i wg0 -j ACCEPT; ip6tables -t nat -A POSTROUTING -o ens18 -j MASQUERADE; iptables -A FORWARD -o %i -j ACCEPT
PostDown = iptables -D FORWARD -i wg0 -j ACCEPT; iptables -t nat -D POSTROUTING -o ens18 -j MASQUERADE; ip6tables -D FORWARD -i wg0 -j ACCEPT; ip6tables -t nat -D POSTROUTING -o ens18 -j MASQUERADE; iptables -D FORWARD -o %i -j ACCEPT
ListenPort = 51820
A short explanation
The PrivateKey is taken from the file /etc/wireguard/privatekey, which you have created before. The content comes after the = and without the brackets.
Address for IPv4 should be clear and I have already explained the range. Regarding IPv6, you should use a ULA (Unique Local Address) at this point. Even though the IPv6 range is huge, these ULAs should not be routed over the Internet (RFC4193). The possibilities at this point are incredibly high. I simply created a random private address range thanks to this website. But you can leave out IPv6 if you don’t want to use it.
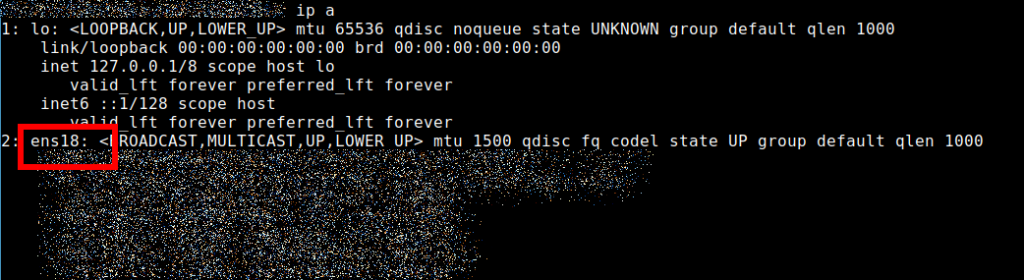
PostUp and PostDown make sure that the routing entries are set when you enable or disable the interface wg0. It is important at this point to find out which network interface you want to route through or which will be your gateway to the Internet. For my Ubuntu VPS, this is ens18. On the Raspberry Pi it is eth0. You can find the interface with the command:
ip aIt looks like this and you have to adapt it in your configuration:
You can choose the ListenPort yourself. 51820 is the default, but here you can choose what you want. If you are using a firewall, make sure that the port is accessible. For example, if you are using ufw, the following command may help you in case of problems:
ufw allow 51820/udpLet’s secure the file:
chmod 600 /etc/wireguard/wg0.confActivating the WireGuard interface
Once the configuration file is created, we can start the VPN interface on the server (Ubuntu or Raspberry Pi):
wg-quick up wg0The up is followed by the name of your configuration. Simply put, it is the name of the file without the .conf — in my case it is wg0.
Now we check if the interface is also started:
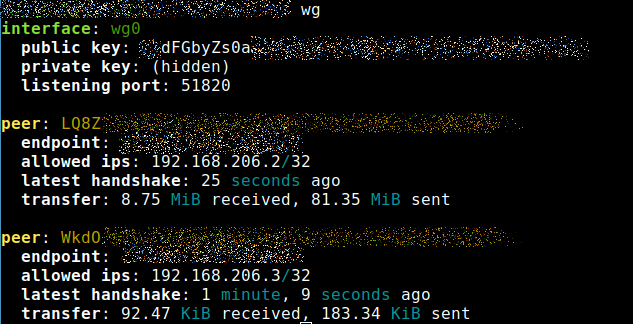
wgGreat — it works!

Configuration of the clients (Android / Linux)
Now it depends on which client you want to connect via WireGuard. I will explain two scenarios and the others are similar. First, I configure an Android device to connect to the WireGuard VPN server. Then I show you how to connect your Linux client (works the same for all Linux clients).
For Android, download the necessary software from the Google Play Store or F-Droid. Open it and click on the plus sign in the lower right corner. Create a new connection by selecting Create from scratch. A screen will open, and we’ll need to fill it in:
- Name: you can choose freely
- You create Private key and Public key by clicking on Generate.
- Address: this is the IP address that the device should use in the VPN. My server has 192.168.206.1 and my client gets 192.168.206.2/32.
- You can use any DNS server you want to use. Here is the promised tip how to get an ad blocker with the VPN. Use the public pi-hole from dnsforge.de: 176.9.93.198, 176.9.1.117, 2a01:4f8:151:34aa::198, 2a01:4f8:141:316d::117.
Adding a peer
Then click on ADD PEER and use the information regarding your server:
- Public key: The public key from the file /etc/wireguard/publickey of your server or Raspberry Pi.
- Allowed IPs: 0.0.0.0/0, ::/0 (this means that all traffic is routed over the VPN)
- Endpoint: the public IP address of your server, followed by :Port, in my case :51820. It also works if you use a domain name. This is important if your Raspberry Pi is reachable via DDNS.
It looks like that on my Android device — I use a domain name and not an IP address.
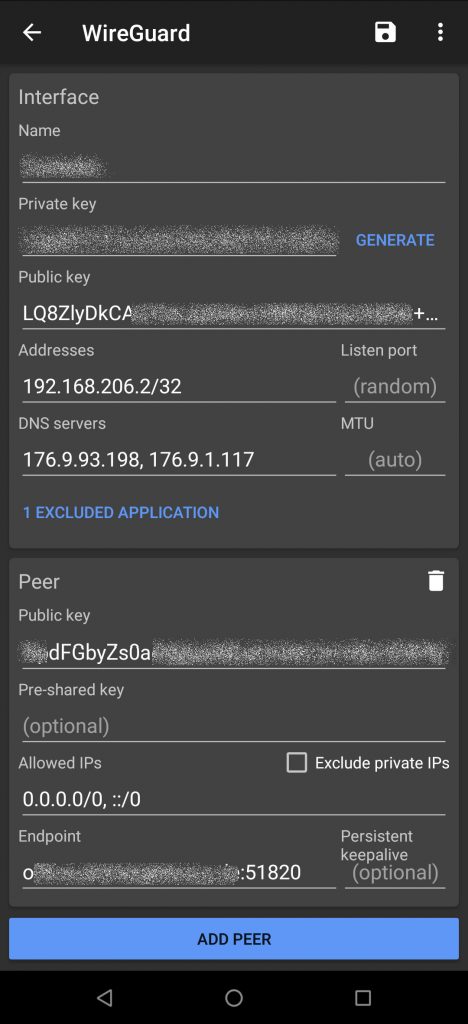
In my screenshot you can also see that there is 1 EXCLUDED APPLICATION. Here you can store apps that should bypass the VPN. For me, this is the Kodi remote control Kore because otherwise I can’t control my music when connected to the WireGuard VPN server. 🙂
Allow the client to connect to the server
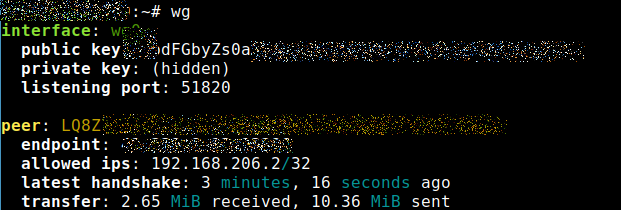
Now we continue on the server, and we need the public key of the client. As you can see in the screenshot above, it starts with LQ8Z. There you allow the client to connect:
wg set wg0 peer <public key of the client> allowed-ips 192.168.206.2/32Now you can connect your Android device. If you use the command wg again, something like this should appear:
Connect Linux to the WireGuard VPN Server
I have connected my Linux Mint 19.3, but the configuration works the same for all Linux distributions. The principle is even equivalent for all operating systems. First you have to install WireGuard as described above. In my case straightforward because I can use the PPA.
Then I have to create a key pair (public / private) again. This works on the client like it did on the server:
cd /etc/wireguard
umask 077
wg genkey | sudo tee privatekey | wg pubkey
Then I create a configuration file (I call it wgclient0.conf to make it clear) with the needed values. My second client should get the IP address 192.168.206.3/32. My file looks like this (again with the public pi-hole from dnsforge.de)
[Interface]
PrivateKey = <your private key>
Address = 192.168.206.3/32
SaveConfig = true
DNS = 176.9.93.198, 176.9.1.117, 2a01:4f8:151:34aa::198, 2a01:4f8:141:316d::117

[Peer]
PublicKey = <public key of your server>
Endpoint = <IP address of the server or domain>:51820
AllowedIPs = 0.0.0.0/0, ::/0
As with the Android client, you also adapt port 51820. The DNS servers you also can choose freely.
Afterwards, you make sure that the new client is allowed to connect to the server:
wg set wg0 peer <public key of the client> allowed-ips 192.168.206.3/32Afterwards, you can start the connection. As before, this is the name of the connection without the .conf at the end. We use the wg-quick command again on the client:
wg-quick up wgclient0Now both my smartphone and my Linux computer are connected to the WireGuard VPN Server:
If you want to disconnect, use the following command:
wg-quick down wgclient0It really is that simple. Once the thing is set up, you are connected in a split-second and the VPN tunnel is established.
Some additional tips and tricks for the WireGuard VPN Server
Here is a section with problems and solutions I noticed during my use. Sooner or later you might run into them as well — especially when a new kernel is installed or Linux is updated.
Autostart of the network interface on the WireGuard VPN Server
The start of the WireGuard interface does not survive a restart. But you don’t have to configure it manually every time. On Ubuntu and Raspbian we can enable the wg interfaces on boot — we auto-start it:
systemctl enable wg-quick@wg0On my Linux client this works, of course, too, but here I would have to adjust the command in my case because the configuration file has a different name as you remember:
systemctl enable wg-quick@wgclient0At this point it depends on how you have named your configuration files and thus the interfaces.
WireGuard is roaming capable
The connection to the WireGuard VPN server remains active even if you change networks. For example, if you leave your Wi-Fi at home with your Android smartphone and your mobile Internet connection is activated, the VPN remains active.
With newer Android versions you can also set WireGuard as continuously active VPN in the Settings via Network & Internet -> VPN. Another option there is block connections without VPN, which is like a kill switch.
In case you block connections without VPN this supersedes the EXCLUDED option in the app. So be careful with that.
User Management Script for the WireGuard VPN server
There is a WireGuard user management script on GitHub that allows you to add users on the server and create configuration files. If it’s just a few clients, it might be a bit overkill.
The nice thing about the script is that it also creates a QR code. This makes the setup on mobile devices easier because the Android client can read and process QR codes.
It’s a nice to know in case you need it.
Create a configuration file for somebody else
Of course, you can also create a configuration file for someone else. The files privatekey and publickey do not need to be created or kept in the directory /etc/wireguard. They are just fine there because the directory itself should be protected.
You can also create the keys for someone else, create a configuration file and send it. The VPN’s Android app even has an option to import such .conf files.
It probably won’t be long before the Network Manager GUI on Linux can import such files. The CLI version can already handle WireGuard.
Note if you install a new Linux kernel!
WireGuard is a kernel module that is automatically installed via DKMS as soon as the system uses a new kernel. However, if it fails to load automatically there are several options how you can fix the problem.
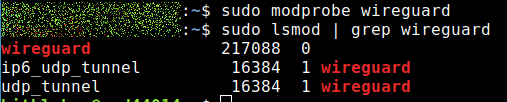
You can find out if the module is loaded with this command:
lsmod | grep wireguardIf the result is empty, try modprobe:
modprobe wireguardAfter that the kernel module should be loaded. I just had the problem that the kernel updated itself and WireGuard didn’t run after that.
If these methods do not work, you can try dpkg-reconfigure to reconfigure the kernel module:
sudo dpkg-reconfigure wireguard-dkmsModprobe turned out to be only a temporary solution for me. It did not survive a restart. Therefore, I usually take the approach with dpkg-reconfigure. This way the WireGuard kernel module loads automatically after a restart.
You can also persuade the system to always load the module on a reboot. To do this, edit the file /etc/modules and insert wireguard.
The module has to be loaded otherwise it will not work. How you get it to run doesn’t matter. 🙂
Is your WireGuard VPN server behind a NAT router?
Do you use a solution with a Raspberry Pi that is behind your home router? Then make sure that the necessary port is open and will be forwarded. In my case, I would have to open port 51820.
If you just can’t find the error, but are sure you have everything configured correctly, check your router. Maybe it blocks the connection.
Good solution, but with shortcomings
The solution with our own WireGuard VPN server works, and very well. However, it strongly depends on what you want to do with the VPN. Of course, you are not anonymous with your solution. Either you use a VPS that can be traced back to you or your Raspberry Pi uses the connection of your ISP (Internet Service Provider).
The setup is also only partially suitable for bypassing geoblocking. If your Raspberry Pi or your VPS is in the UK and Netflix USA it won’t work. Same goes for your Pi in the USA and you want to watch BBC iPlayer.
The WireGuard VPN Server works very well if you want to protect yourself in foreign networks like are free Wi-Fi or hotspots in hotels, cafés, Airbnb, airplane, bus, train and so on.
The price is of course also an argument. A VPS costs €4 for per month and it doesn’t sound like much money. If you also install your own Nextcloud on it, it might be worth the money. But if you only use the server as a VPN server, you should know that trusted services like NordVPN (big discounts NOW)* and Surfshark (unlimited connections)* are cheaper. The latter VPN provider costs less than half and is the most affordable VPN service you can trust. Both providers are superb at bypassing geoblocking and you get access to Netflix USA, BBC iPlayer and so on.
Personally, I prefer NordVPN because the Linux client also runs on the Raspberry Pi and you can easily build your own VPN router with a Raspberry Pi. NordVPN has also been providing NordLynx for quite some time now and this is their WireGuard implementation for Linux. The connection is faster, as speed tests show.
The solution with the Raspberry Pi as VPN router also works, of course, if the Pi is client itself and logs into your VPS WireGuard VPN server.
Fredrik
says:One question…
I installed PIVPN at my Pi 4 with Wireguard and gets about 50 Mbit. Would it be better to install Ubuntu at the same hardware if I only look at VPN performance? PIVPN is still 32 bit and Ubuntu is 64.
guyfawkes
says:I doubt it that the speed will improve. The 32-Bit OS of the Pi basically has the only limit that one process cannot consume more than 3 GByte of RAM. That shouldn’t be the case here. The Raspberry Pi Foundation is working on a 64-Bit OS btw and there is a Beta out now if you are interested.
But you can also use PiVPN open a terminal and monitor with top or htop if the Pi 4 is on the limit — still with a new OS the hardware doesn’t change.
I would go that way: if you are happy with what you got — never change a running system.
Fredrik
says:Thanks for the reply. I think I will wait until PI OS is 64-bit (released) with the VPN software. Then I hope it will be faster.
An advantage with PI is that it is easy to just switch SD-card to make another installation/configuration and don’t have to change the existing working system.
guyfawkes
says:You are welcome. It is indeed a big advantage that you can swap SD cards fast plus they are really cheap these days.
Sancho
says:This is excellent guide.
Is there some “donate” possibility to show thanks for the effort you had to invest into this tutorial?
guyfawkes
says:Thanks …
If you want to donate here are some crypto addresses:
Bitcoin: bc1qdcqutay6w7h3vrye6ukg7qq7nurces0el07qaw
Ethereum: 0x484D57b295B616e7cd68f7Ff17b2B383b7e77C70
Litecoin: ltc1ql0mqd7z87656epxl4d5d782rcffqrfuck9nj0j