Now that I’ve been experimenting with my Raspberry Pi 400 for a week and have carefully overclocked the device, I want to back up the data. Since I try to do as many desktop tasks as possible with the Pi 400, I also come into contact with office documents and other files, which I would like to use on other devices. I have an own Nextcloud and therefore the option WebDAV, which I can use to connect the Pi.
The big question arises how to connect the Raspberry Pi 400 or rather Raspberry Pi OS to the Nextcloud. There is no native desktop client for Raspberry Pi OS. You could try to compile it yourself. But then there will be no updates and I don’t know how many resources such a client would need. However, there is a way that needs very little resources.
But first let me tell you which methods I have been trying with Raspberry Pi OS. They either did not work at all or only unsatisfactorily.
Connect to WebDAV via file manager
The file manager of Raspberry Pi OS offers the option to embed WebDAV directly. In the menu you fin the option Connect to Server.
But this is not a very good approach. I can connect and see the content of my Nextcloud. After that I opened a local folder and later I wanted to return to the Nextcloud. But the connection was gone and I had no access to my data.
Besides, the connection doesn’t really do anything for documents. A double click on an office file opens LibreOffice, but the program can’t do anything with the path transmitted. In other words, I would have to copy files back and forth, preferably via browser. This is a bit annoying and nothing is saved automatically.
davfs2 — not really working
This method allows you to mount WebDAV directories in the file system. But the configuration is a bit annoying. Also, I did not pay attention and made an error in the entry in the file fstab. As a result Raspberry Pi OS would not start any more.
It was not a big drama. I was able to remove the microSD card from the Raspberry Pi 400 and fix the faulty entry on the laptop.
It is also not very practical, I found out. If you edit a document and save with Ctrl + S, the document freezes until it is saved. With a slow internet connection, this is just annoying. Unfortunately, I have the habit of saving frequently.
Use WebDAV of LibreOffice
Maybe you know that LibreOffice allows you to connect directly to servers. Among other things you can use WebDAV, SSH, FTP and Windows sharing. You can configure a WebDAV service and use it afterwards.
At this point you will encounter two problems.
- If you save larger files the document seems to freeze for a while again — until it is saved on the server. That is annoying.
- You can only use it to edit office files and not to back up or store other data on your Nextcloud.
If it’s only about office documents, I think Collabora Online / LibreOffice Online in the browser is the better option. You have to be online for this, but editing is much more convenient. This works quite well. But again, the approach is only suitable for office documents when you are online.
rclone — rsync for cloud storage — perfect for me
I am a big fan of rsync when it comes to backups. But for the Nextcloud rsync is a bit fiddly. But there is a variation of it called rclone. The software calls itself rsync for cloud backups. You find the software in the repositories of Raspberry Pi OS and it supports WebDAV. Therefore you can use it to back up your date from the Raspberry Pi 400 to the Nextcloud. The installation is quite easys:
sudo apt install rcloneI have set up a remote directory called pi-400 on the Nextcloud. The local directory for synchronization is called nextcloud. You set up rclone with this command:
rclone configJust follow the instructions. It’s not difficult. Now I use the following command to synchronize all local data from the nextcloud folder to the Nextcloud — into the Local folder pi-400. (The names of my connections are Local and Nextcloud)
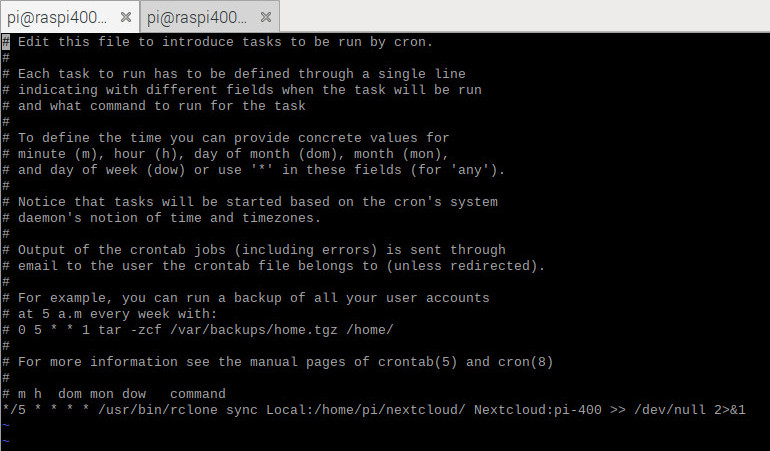
/usr/bin/rclone sync Local:/home/pi/nextcloud/ Nextcloud:pi-400A synchronization is not done immediately as with the Nextcloud client, but you can use a cronjob. How often the sync process should run is up to you. Every 5 or 10 minutes is enough for me.
crontab -e*/5 * * * * /usr/bin/rclone sync Lokal:/home/pi/nextcloud/ Nextcloud:pi-400 >> /dev/null 2>&1This way I have the files on my Nextcloud and they synchronize to other devices.
Flow of data is in one direction.
Important! My method here is to synchronize from Pi to the Nextcloud in one direction. The folder on the Nextcloud is a mirror of the local folder. If you delete a file in the nextcloud folder on the Raspberry Pi 400, it will disappear on the Nextcloud as well. If you delete a file on the Nextcloud, it will not help. The Pi would synchronize / upload it again. Please be careful at this point!
Of course this is a compromise. But I can live with it very well because it also uses little resources. The Raspberry Pi 400 is faster than its predecessor and a lot of fun. The keyboard feels very smooth and so on. But you also have to be aware of what you have in front of you — it’s not a rocket. But if you conserve resources wherever possible and set up the system cleverly, it will be a small replacement desktop.
Backup via WebDAV
You will have noticed that this method is also very suitable for data protection or backup. Maybe you program on the Raspberry Pi 400, learn Python and so on. Of course, you don’t want to lose your creations in case the microSD card fails. In any case, it never hurts to have a backup.
Some Nextcloud providers even give you 1 GB of free storage space and you can access it via WebDAV. 1 GB is a lot for typical Raspberry Pi data. It doesn’t matter if it is Python scripts, Scratch programs and so on. Even for documents there is plenty of space.
You just have to be careful when shutting down the device. Maybe your latest data is not saved yet. It depends on how you set up the cronjob.
Now you can run the rclone command manually or use systemd. In this case, the systemd script should be placed in the folder /lib/systemd/system-shutdown/. If you configure your Raspberry Pi in this way, your personal data is optimally protected.
I mentioned in the beginning that you should use as little resources as possible on the Raspberry Pi. A VPN can help you with that if you use one with an integrated ad blocker. NordVPN (big discounts NOW)* offers a command line client for Raspberry Pi OS (including the fast WireGuard protocol) plus the ad blocker feature CyberSec (that also block trackers and other malware). NordVPN works very well on my Raspberry Pi 400.
P.S: In case anyone is interested — I wrote this article completely on the Raspberry Pi 400, including screenshots and photo editing.