To use your Raspberry Pi as a hotspot or access point is actually straightforward. You will find many guides that talk about lengthy manual configurations via command line with hostapd and so on. But it is actually much easier if you use RaspAP. Not only is the installation much easier – you also get a graphical interface (GUI) to manage your Wi-Fi hotspot or access point. Once this is done, you only need a few simple additional steps to turn your Raspberry Pi into a VPN router. RaspAP does work Raspbian Buster that I am using in this tutorial.
Quick guide how to use your Raspberry Pi as a VPN router
To use your Raspberry Pi as a VPN router seems to be more complicated that it actually is. In a nutshell those are the steps required:
- Install Raspbian Buster
Install Raspbian Buster onto your Raspberry Pi. I am using Raspbian Light as a graphical interface is not necessary.

- Get RaspAP
Get RaspAP up and running. This turns your Raspberry Pi into a Wi-Fi hotspot or access point.

- Get a VPN
Get a VPN that runs on Raspbian and ideally one with a command line client. I’m using NordVPN as it has one of the most versatile Linux clients on the market. You can try NordVPN as the service offers a 30-day money-back-guarantee. It is undoubtedly one of the best VPNs on the market. Try NordVPN 30 days without risk!*

- Install the VPN
Install the VPN on Rasbian and connect to a server.

- Enjoy your VPN router!

Quick Guide from the comments (thanks!)
Software changes and sometimes it gets easier. Thanks for this quick guide from a recent installation:
- Update the system and set Wi-Fi country (https://raspap.com/#manual-installation Prerequisites)
- Get NordVPN* and install the client (you might need to reboot here)
- Configure the client:
- Log in
- Whitelist ports 22, 67-68 (
nordvpn whitelist add portornordvpn whitelist add ports) - Switch to nordlynx (
nordvpn set technology nordlynx) - Deactivate NordVPN Firewall:
nordvpn set firewall off - Install RaspAP
- Configure RaspAP:
- Change SSID, password etc.
- Use NordVPN DNS addresses (103.86.96.100 and 103.86.99.100) in RaspAP to avoid leaks
- Restart
That is pretty straightforward and really worth a try.
Update: With Linux client 3.9.0 you can set the firewall on or off (nordvpn set firewall on/off). That might be helpful as well for your router.
If your connection does freeze once in a while – maybe that script helps:
! /bin/bash

PING="/bin/ping -q -c1"
HOST=example.com

${PING} ${HOST}
if [ $? -ne 0 ]; then
/usr/bin/systemctl restart nordvpnd.service
sleep 45
/usr/sbin/runuser -l pi -c 'nordvpn c UK'
fi
Please check HOST in case you want to ping something else. Also change the user after runuser -l – in my case that is pi because the script runs on a Raspberry Pi läuft. The script starts the MordVPN daemon new if the ping fails – after a certain waiting time it connects to the UK. Of course, you can change that as well.
Prerequisites for using RaspAP on a Raspberry Pi
For this to work, you need a Raspberry Pi with two network cards. One of them must logically be a wireless network card (Wi-Fi) because it serves as a hotspot or access point. The other network card could theoretically also be a wireless network card, but better is the integrated Ethernet interface. The Raspberry Pi 4 shown below also works, of course.
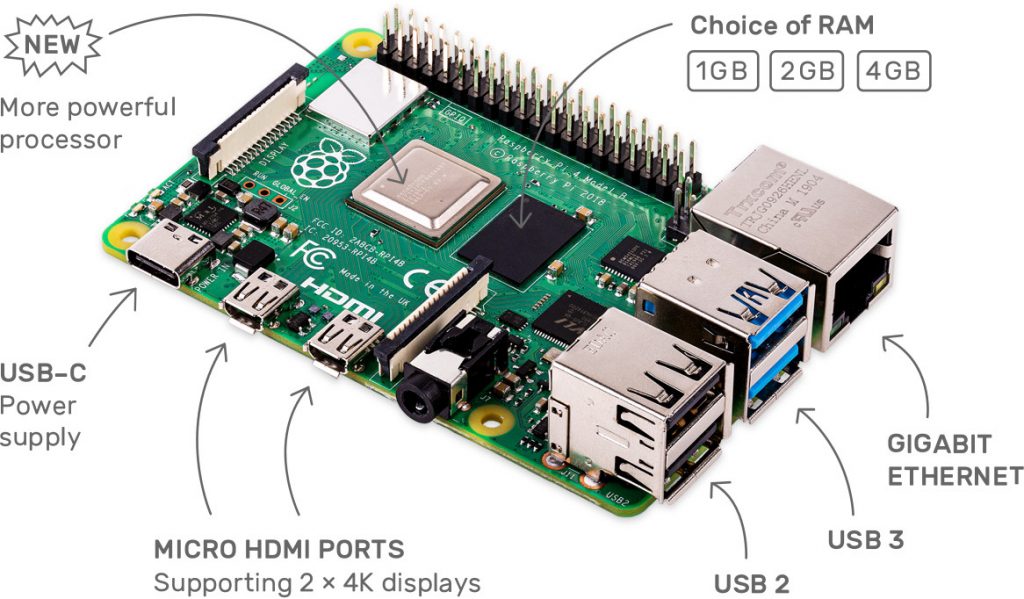
Let’s put it this way: The easiest way is to use a Raspberry Pi that already has an Ethernet and wireless interface. The Pi expert knows immediately that we are talking about the Pi 3 B upwards. For Pis without an integrated Wi-Fi card, it’s best to use a cheap, compatible USB network interface. I have had very good experiences with the Edimax. The cost is about 7 Euro.
Logically you need a suitable power supply, a microSD card and so on. With the microSD card a relatively small one is enough, but you hardly get anything under 16 GB these days. They only cost about 10 Euro — affordable so. You also need a network cable if you want to follow my instructions.
Mouse, keyboard and screen are not necessary! As already mentioned, I use Raspbian Buster as my operating system. But the lite version is enough for me, and we configure the operating system so that you can access it immediately via SSH.
Which Raspberry Pi should I use for the hotspot?
That’s a good question. The new Raspberry Pi 4 is powerful and works very well but it needs more power than its predecessors. If you don’t want to buy an additional network card, you can use both Pi 3 B and Pi 3+ B. The most energy saving would probably be a Raspberry Pi Zero W, if you extend it with an Ethernet interface. It might not powerful enough for a task like that but I didn’t test it to be honest.
My scenario
I tested RaspAP with a Raspberry Pi 3+ and used the integrated network interfaces. The Ethernet interface was connected to the router. This is my gateway to the Internet.
Install Raspbian Buster Lite on the microSD card
In the download area of the project page you can find the image for Raspbian Buster Lite. It has 426 MB and should be downloaded relatively fast.
Update: The Raspberry Pi Imager is a nice option to install Raspberry Pi OS Lite.
As soon as you have the image, you can upload it to your microSD card. I use Etcher because it’s the most convenient way. But also dd or other options are possible.
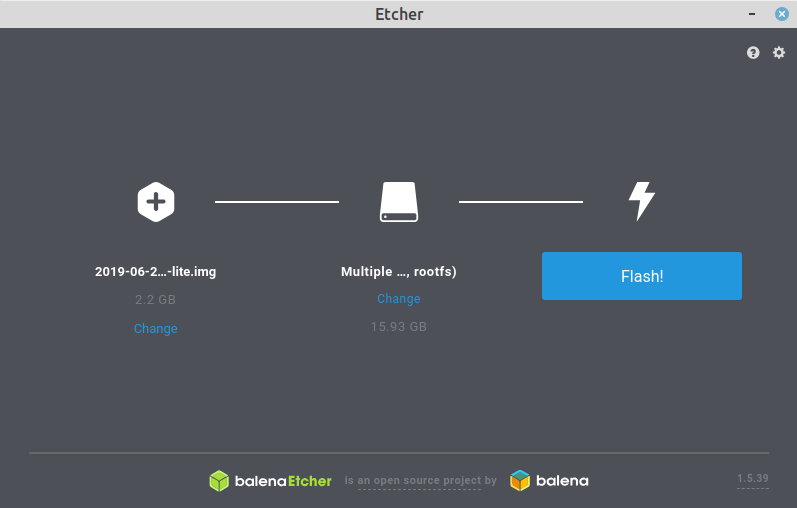
Depending on the OS and speed of the microSD card, the installation may take a while. Once the image has been installed, mount the microSD card again because we immediately prepare the operating system for remote access.
SSH access from the beginning
Simply create an empty ssh file on the boot partition without an extension. This is very easy under Linux. For example, the command touch ssh is sufficient. The boot partition looks like this afterwards:

If the file ssh exists, Raspbian activates the SSH server at system startup and you can access the operating system via Secure Shell. This way you don’t need a screen, keyboard or mouse. If you connect the Pi to the router via the Ethernet network cable, no further configuration is necessary because the Pi is assigned an IP address by the DHCP server of the router.
It gets a little more complicated if there is no DHCP server in the network or if you want to use a wireless network card as gateway. As already mentioned, the Pi in my case uses a network cable.
Determining the IP address of the pi
If you have started the Raspberry Pi, then you find out the IP address. Usually it is enough to check the router. Most routers tell you which devices are within the network and which IP addresses have been assigned.
I like to assign static IP addresses to such devices. Normally, you can assign an IP address to a MAC address in the DHCP server of the router. This way the Raspberry Pi always gets the same IP address and you don’t have to configure it within the operating system. Another advantage of this method is that the DHCP server does not assign the IP address to any other device. DNS servers and so on are also assigned to the PI by the router.
As soon as you know the IP address, remote access should be possible. In my case, the IP address was 192.168.1.2. By default, the name and password of the SSH access on a Pi are: pi and raspberry:
ssh pi@192.168.1.2On first access you have to confirm that access is really granted.
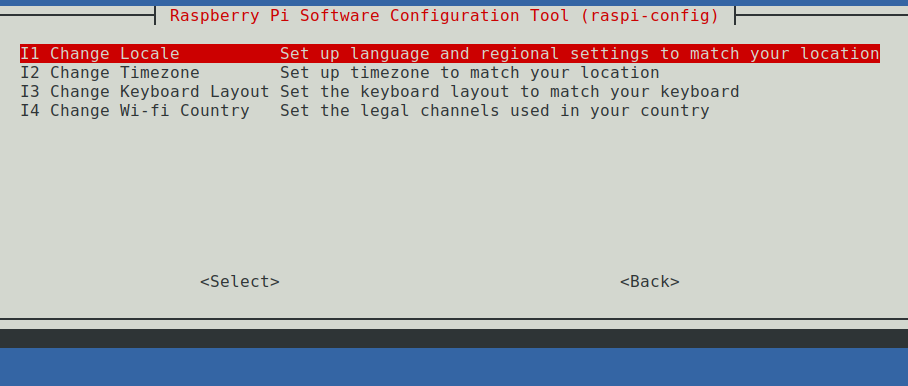
As soon as you are logged on to the Raspberry Pi, you should change the password for the user pi immediately, otherwise everyone in the same network can get access to your device. Either you use the command passwd or you open the Pi configuration:
sudo raspi-configThis opens the command line configuration tool.

Because the configuration tool is already open, you can also set the country settings right away — if necessary:
Update Raspbian Buster straight away
It is also advisable to update the system. An upgrade never hurts and Raspbian know the drill anyway:
sudo apt update
sudo apt dist-upgrade
sudo reboot
Now you need to restart the device before you continue. After that, you have to reconnect to the Pi via SSH. Once the operating system Raspbian Buster is updated and the system restarted, we can convert the Pi into hotspot with RaspAP.
Installing RaspAP – step by step
Now we install RaspAP. The project page can be found at raspap.com. We don’t have to visit it directly, but it doesn’t hurt to know the source. If you are logged in on your Pi, you install RaspAP just like that:
wget -q https://git.io/voEUQ -O /tmp/raspap && bash /tmp/raspapThe installation is starting now:
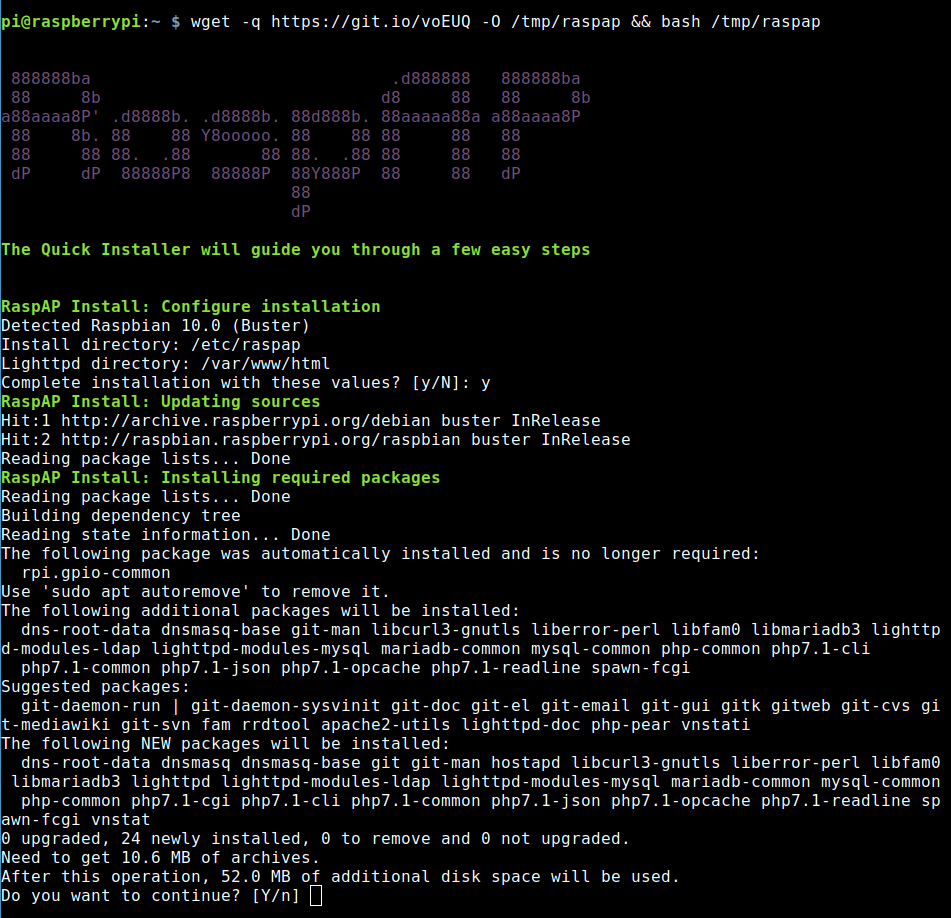
During the installation I had to answer a few questions, which I answered with Yes: http-cookies -> Yes – Control service -> Yes

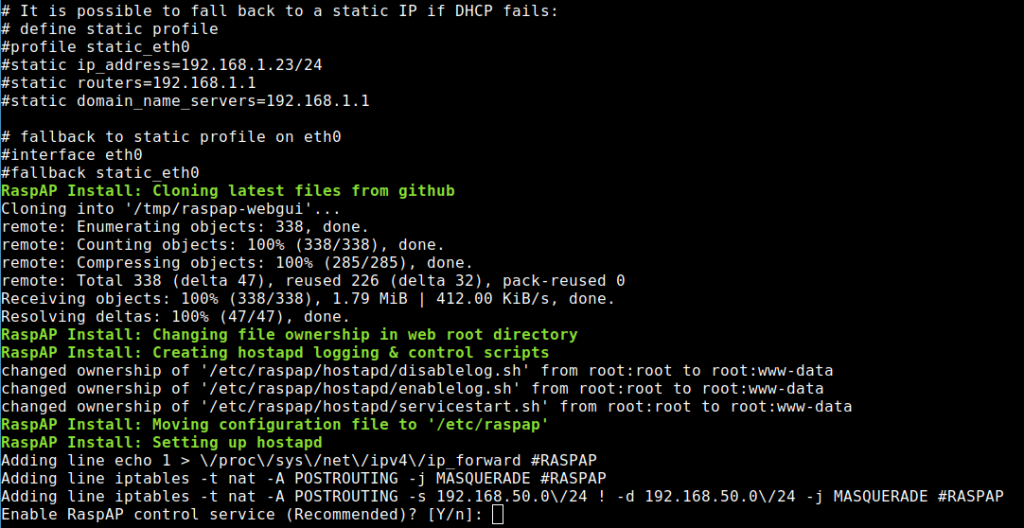
Furthermore, the system asks if you want to install the ad blocker and the OpenVPN client. I installed both. The functions don’t hurt, and you don’t have to use them if you don’t want to.
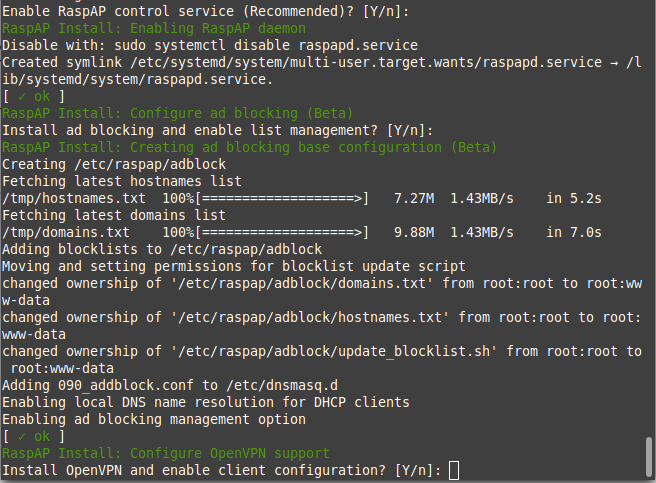
That’s all and it! RaspAP is installed on your system!

As you can see in the screenshot, the system wants to restart. So, we do RaspAP the favor.
IP address of RaspAP or the hotspot
By default, the hotspot gateway has the IP address 10.3.141.1. This is fine because it does not interfere with the other 192.168.1.x network. I have not changed anything at this point. As DHCP area RaspAP is preconfigured with 10.3.141.50 to 10.3.141.255.
By default RaspAP has the name raspi-webgui as SSID and the password is ChangeMe. The hotspot or access point is now ready for use and you can log in. You can change the password and SSID in the web GUI if you want.
Here is what you need to know as the default settings:
- IP address: 10.3.141.1
- Username: admin
- Password: secret
- DHCP range: 10.3.141.50 — 10.3.141.255
- SSID: raspi-webgui
- Password: ChangeMe
RaspAP’s web gui
You configure your hotspot completely via your browser. Either you log in to the hotspot and use URL 10.3.141.1 or you are in another network and open the admin interface with (in my case) 192.168.1.2.
By default, you log in with admin and secret. At this point I would advise you to change all passwords first and adapt the hotspot to your needs. You can also configure the DHCP server via the web GUI. Here are some screenshots, how it looks like.
Under Configure hotspot -> Basic you can configure how the Pi hotspot should be found. In my case I changed it to pi-hotspot for example.
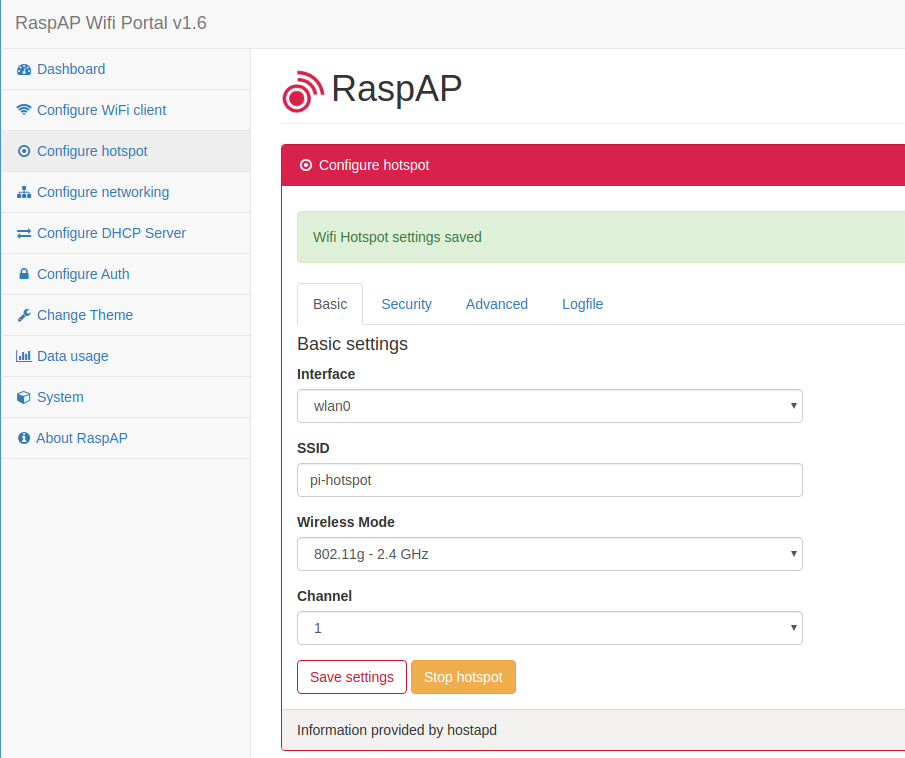
That works and I can connect:

A ping to my website confirms to me that I can access the internet via RaspAP.
You change the password for the hotspot under Configure hotspot -> Security. Maybe you want to change Security type to WPA + WPA2.
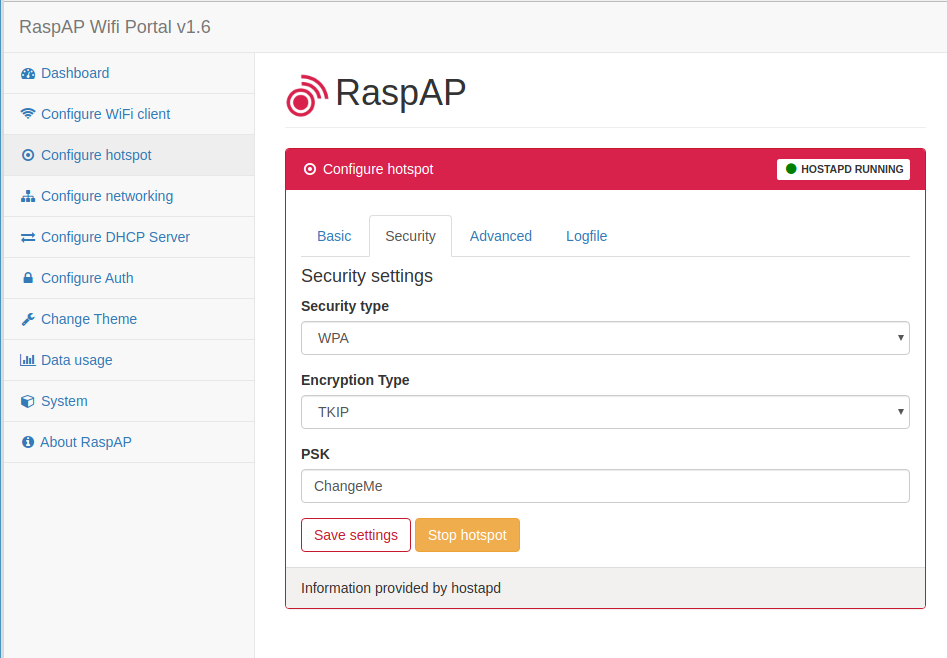
The settings or the DHCP server are under Configure DHCP Server:
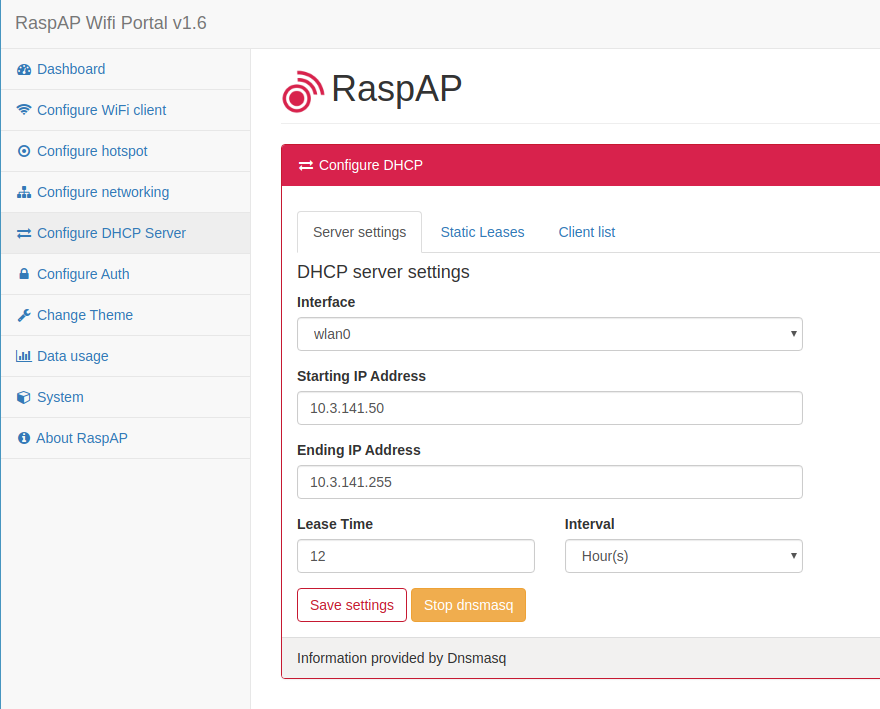
In most cases you don’t have to change these settings.
More settings for RaspAP
The hotspot software also offers a console.
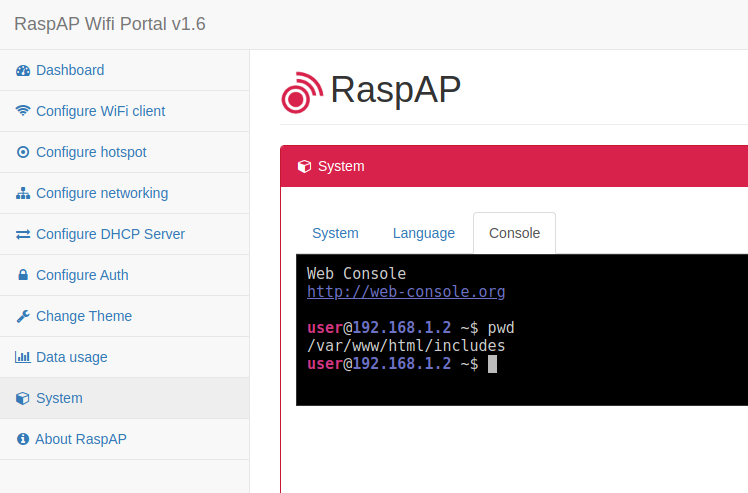
However, it is only of limited use, since it does not give you root access and you cannot switch with sudo. I would leave that as is and manage the operating system exclusively via SSH.
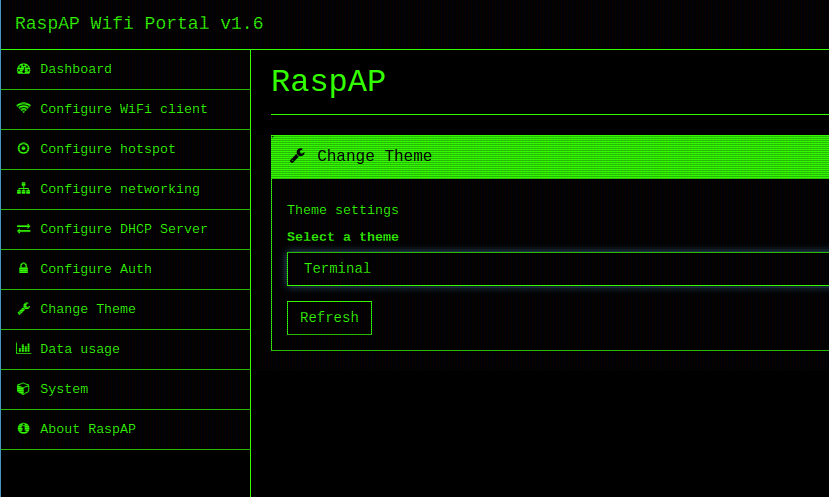
You don’t like the theme? Change it! There are a few other options like a terminal theme.
if you open the Dashboard you always see the most important settings straight away.
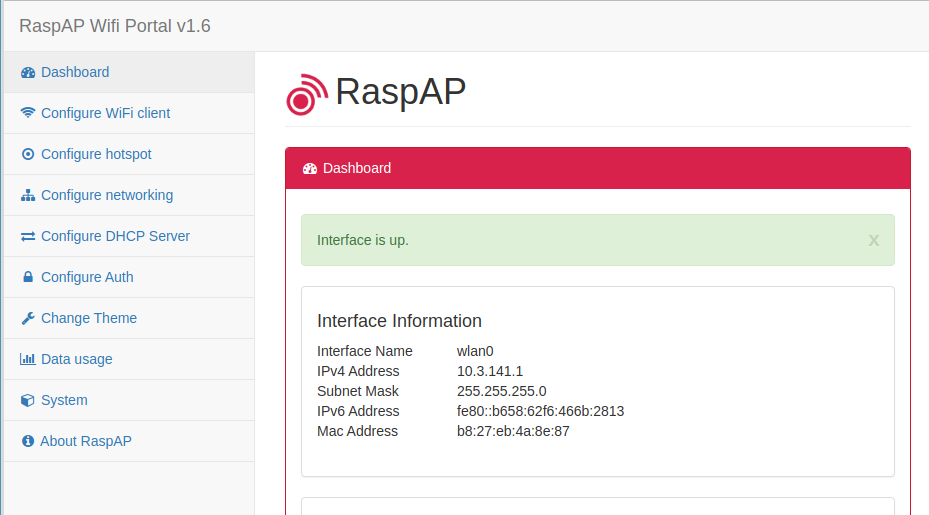
As you can see, the installation of RaspAP is simple. But basic knowledge of networks in general is helpful.
Changing the DNS server of RaspAP
Update: In more recent installations of RaspAP you can set the DNS addresses within the GUI. There is no need to do it via command line if you prefer a graphical interface.
By default, RaspAP uses 1.1.1.1 (Cloudflare) and 8.8.8.8 (Google) as DNS servers. The DNS servers are stored in the file /etc/dhcpcd.conf.

If you want to use your own, change this here. Maybe you have the adblocker Pi-Hole in your network and RaspAP should use it as DNS server. FreeDNS is also a nice alternative.
Your Raspberry Pi is now a working Wi-Fi hotspot or access point. Now we will turn it into a VPN router. Did you already register with NordVPN?
Once you have RaspAP installed and running, take the next step and build your own VPN router. These are just a few additional steps. In this article, I’ll explain step-by-step how it works.
VPN router only counts as one device!
Many VPN providers allow the use on a router and your Raspberry Pi will only count as 1 device or 1 connection, no matter how many smartphones, tablets and computers are connected to it.
That is a nice advantage if you ask me. Furthermore, you can use it as a Wi-Fi access point for devices where no VPN client does exist for. Connect your Chromecast to the VPN router, your Smart TV, your gaming console and so on.
A VPN router is also an excellent choice if you want to connect a Kodi device to it. LibreELEC is a very nice operating system if you want to install Kodi on a Raspberry Pi. But there is no easy way to use VPN apps for Kodi or LibreELEC. However, you could connect your LibreELEC device to your VPN router and circumvent the issue.
Don’t forget the rise of IoT (Internet of Service) devices! A lot of them will connect to Wi-Fi but have very limited options to install additional software. For a lot of those devices the only option to use a VPN is a VPN router.
If your Raspberry Pi acts as a VPN router you don’t need to install a client on every device you want to use the VPN. Just connect the Pi to the server or country you want to use and connect the devices to the Pi. It really is that simple.
So let’s get started and turn the Raspberry Pi into a VPN router.
Do all VPNs work?
In theory any provider that provides ovpn files works. This allows you to connect to the provider manually via the OpenVPN protocol. First, I’ll show you how to use the Linux client from NordVPN to build a VPN router as this is the most convenient way. After that I’ll tell you how it works with a normal OpenVPN connection.
Install NordVPN on the Raspberry Pi and turn it into a VPN router
If you want to follow my instructions, you need a subscription to NordVPN. It’s great that the VPN provider offers a 30-day money-back-guarantee. You can first try out whether your Raspberry Pi runs properly as a VPN router and if not, you simply demand your money back. The provider doesn’t ask stupid questions and usually refunds rapidly.
My Raspberry Pi runs headless — without peripheral devices like screen, mouse and keyboard. I log on to the device via SSH. After that, I download the deb file from NordVPN.
wget -c https://repo.nordvpn.com/deb/nordvpn/debian/pool/main/nordvpn-release_1.0.0_all.debNow you install the file via shell:
sudo dpkg -i nordvpn-release_1.0.0_all.debThe deb file is basically only setting up the repository. You have to update the package information and after that you install the Linux client of NordVPN.
sudo apt update
sudo apt install nordvpn
It looks like this:
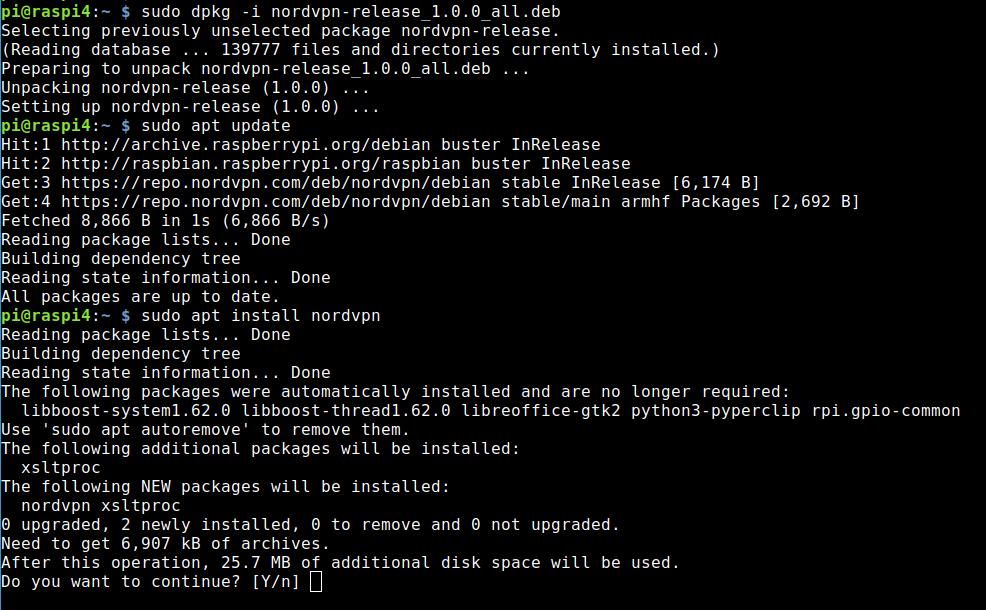
Setting up the NordVPN client
The first step is to log on to the client with your access data from NordVPN:
nordvpn loginNow the client asks for username and password.
The Linux client of NordVPN provides a so-called Whitelist. I put port 22 here to be on the safe side so that SSH access is possible in any case.
nordvpn whitelist add port 22You can review the settings with the following command:
nordvpn settingsQuick connect to NordVPN work like that:
nordvpn cImportant! Now the Raspberry Pi does not work anymore as a hotspot or access point! If you are still connected to the Pi hotspot, you won’t feel a difference. But new connections are impossible — so we need to fix that.
NordVPN changes iptables on our VPN router (if the firewall is on)
The reason for the behaviour is that the Linux client of NordVPN modifies iptables — if the firewall is not deactivated. I recommend deactivating the firewall because it saves a lot of hassle.
If you want to proceed with the firewall active here are a few hints and tips. You can view the current rules with that command:
sudo iptables -SIf you do that before and after a connection to the VPN you see what I mean:
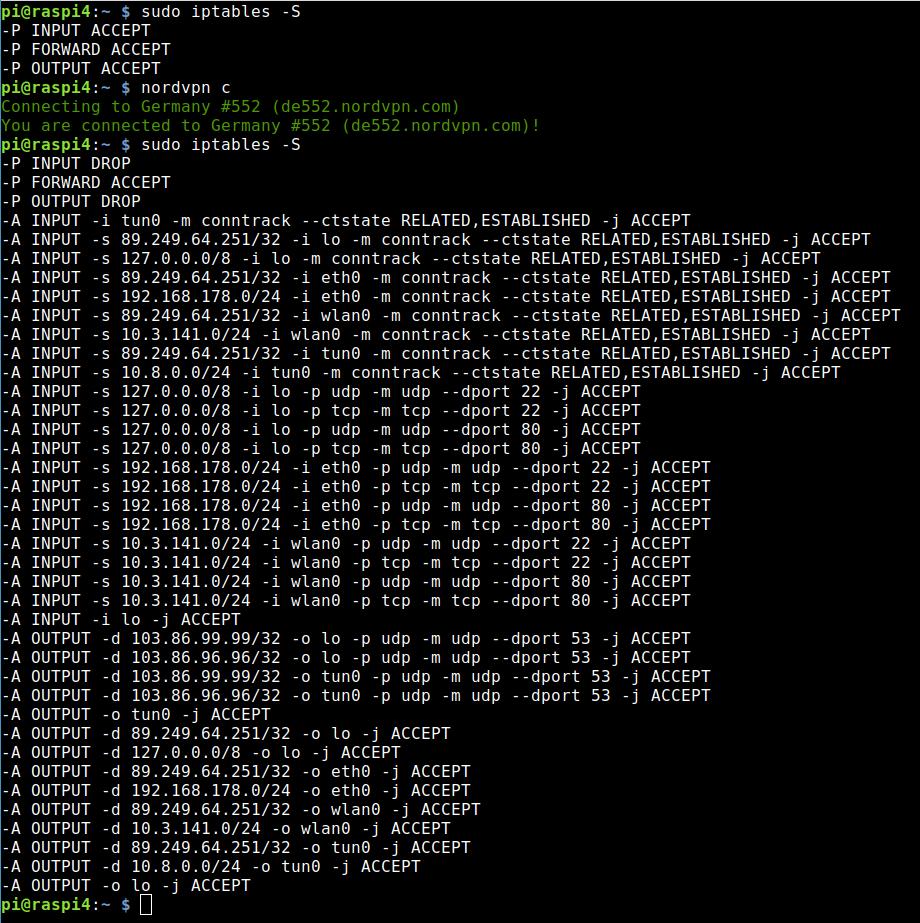
If I want to connect to the Pi Hotspot now, I don’t even get an IP address anymore. That’s why I execute the following two commands and the hotspot assigns me an IP address again and works as designed:
sudo iptables -P INPUT ACCEPT
sudo iptables -P OUTPUT ACCEPT
However, the device does not route my traffic to the Internet. Therefore, the following iptables entries are necessary.
sudo iptables -t nat -A POSTROUTING -o tun0 -j MASQUERADE
sudo iptables -A FORWARD -i tun0 -o wlan0 -m state --state RELATED,ESTABLISHED -j ACCEPT
sudo iptables -A FORWARD -i wlan0 -o tun0 -j ACCEPT
Now everything works as designed — but there still is a little catch.
Making the settings for VPN router permanent
With the commands shown above, the settings are only temporary. They are lost as soon as you restart the Raspberry Pi. The first two commands will also be overwritten when you connect to another NordVPN server.
Now there are several options to make the settings permanent. Of course, I want NordVPN to connect to the startup immediately. A cronjob via /etc/crontab is an option. For this, I first create a script file, which I simply call nordvpn.sh.
nano nordvpn.shI put the following lines into it:

I need the line sleep 30 because the NordVPN daemon needs a bit after the system starts and the command
nordvpn c UKwould not be executed. As you can imagine, that command would connect me to a server in the UK. In this case you would be able to stream BBC iPlayer for example.
I tried with sleep 20 and sometimes it worked — sometimes it didn’t. So, I opted in for a 30-second wait and that is OK. The file need to be executable as well.
chmod +x nordvpn.shNow I put the following line at the end of the file /etc/crontab:
@reboot pi /home/pi/nordvpn.shIt looks like this now:
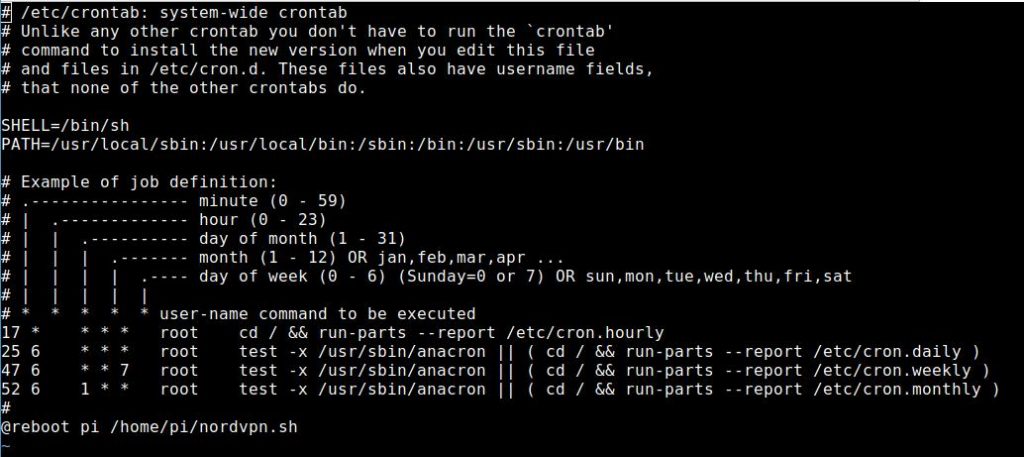
Tip: If you want to execute the script via /etc/rc.local be aware that the user pi has to run the command. The login data of NordVPN are stored per user and that is in this case pi. Per default the user root will be in charge of the file rc.local!
su pi -c '/path/to/script'The above command would execute the file as user pi.
Connect automatically to the VPN – VPN router has to be reconfigured
It is possible that the connection to the VPN fails – that happens once in a while. In this case, the data traffic of your device would no longer be routed through the VPN. We want the VPN to reconnect automatically in case of a connection failure. You can do this with the command:
nordvpn set autoconnect onThis would also automatically connect the VPN client when the device is restarted. However, the iptables entries are missing and therefore I run my script once the system starts.
You can also specify a country with autoconnect:
nordvpn set autoconnect enabled UKThe software would connect you automatically to the UK.
What happens if the connection goes down?
I disconnected the router from the Internet (pulled the cable) and waited a minute to see what happens. After plugging the cable back in, the DSL line first synchronized and shortly afterwards the Internet connection was restored.
My VPN router still worked as before. If you want to be on the safe side, you could run another mini script every minute as a cronjob. For example, call the crontab as user pi:
crontab -eand use a line like that:
* * * * * /home/pi/nordvpn-minute.sh > /dev/null 2>&1If everything is fine, the script has no effect. If the VPN connection is established, it will not be re-established. In case the iptables settings are correct, the system will not overwrite them. The output of the cronjob is transferred to /dev/null (digital black hole).

The reason for the script is clear. If the VPN daemon connects completely new, it sets INPUT and OUTPUT to DROP and our hotspot doesn’t work anymore.

Yeah, it’s not the most elegant method but it seems to work reliably. I have tried it. If you run the command via cronjob, you don’t have to worry about it at startup. At the latest one minute after the NordVPN daemon is available, a connection to the VPN is established.
You may even want the VPN router to stop working if it fails. This would also be a kind of kill switch and you can see what went wrong.
In the end, you’ll have to experiment a bit to see which solution works best for you. But with a little patience, trial and error, your VPN router will be up and running in no time.
Tip: If your client cannot connect to the Wi-Fi hotspot with the VPN activated try to add ports 68 and 69 UDP (DHCP) to the whitelist.
nordvpn whitelist add ports 68 69 protocol UDPThen try again — maybe with a restart in between. As mentioned at the start you can also try to deactivate the firewall (from NordVPN Linux client 3.9.0 on:
nordvpn set firewall on/offA few thoughts regarding the VPN router
You may want to restart your VPN router once a day. You could also do that with a cronjob.
If you disconnect the VPN connection and then log in again, you might get a faster server assigned.
A web GUI where you can enter the country you want to connect to would be pretty fancy. Maybe that is a project you want to do afterwards. Shouldn’t be too complicated to be honest but you need a web server installed.
OpenVPN – connect the VPN router via ovpn file
Most good VPN providers provide ovpn files so you can set up an OpenVPN connection manually. Clients have the advantage that you can change the country more conveniently. The client of NordVPN has another advantage. You can use CyberSec and the obfuscated servers. CyberSec is a neat feature because it blocks ads, tracker, and malware. Every device that is connected to the VPN router will benefit from CyberSec! The obfuscated servers also known as stealth servers are nice in countries with strong censorship. They might help to beat geoblocking from streaming providers as well.
A connection via ovpn file has the advantage that the hotspot works as designed without any problems. The command does not add any new iptables rules at all.
Install OpenVPN
For this to work, you have to install OpenVPN on the Raspberry Pi:
sudo apt install openvpnThen get the ovpn file you want. To stick to the NordVPN example, you will find the OpenVPN configuration files for all servers on this page. The list is quite long and if you’re looking for a particular server, the page with all the servers is more convenient.
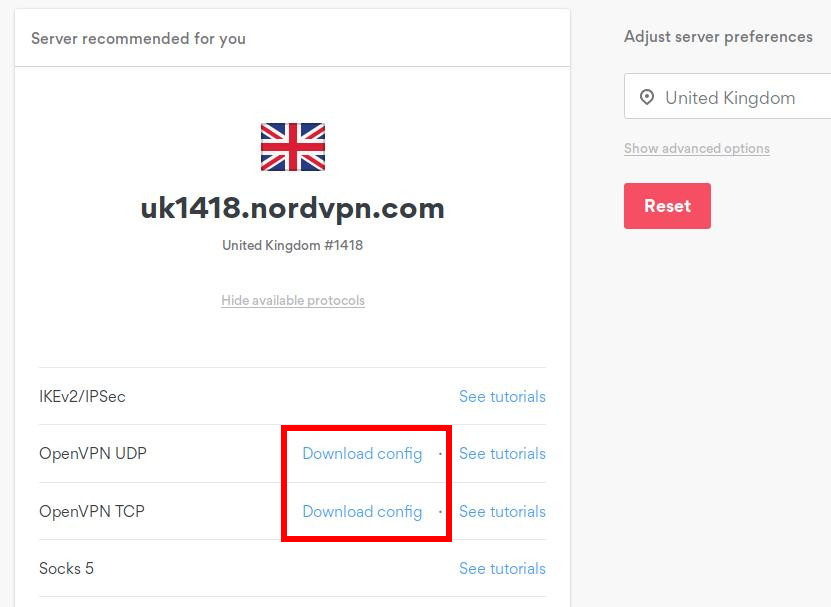
Just with that file you already can establish a connection. If you installed the OpenVPN client for RaspAP you can use the backend to import your .ovpn file.
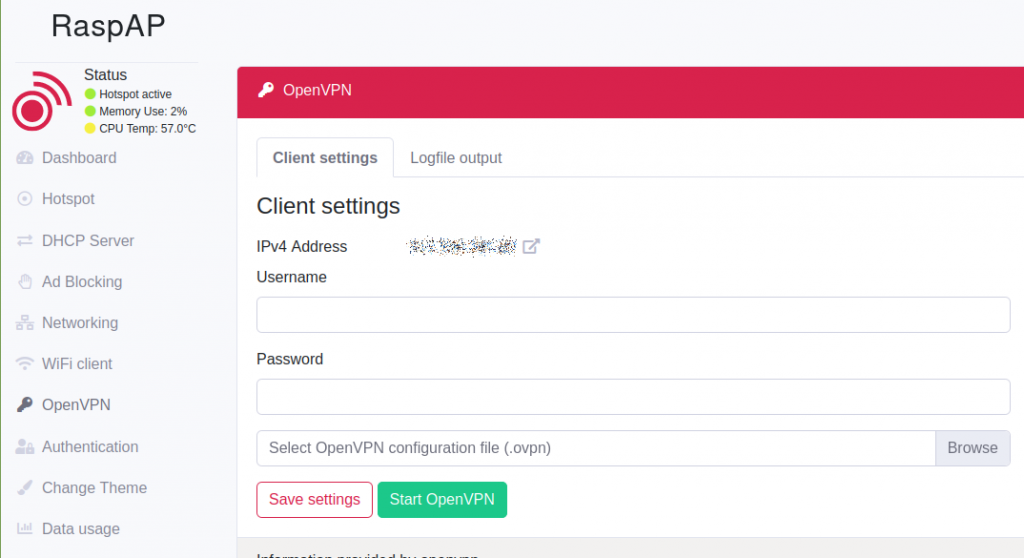
Of course, you can do this manually.
sudo openvpn uk1418.nordvpn.com.udp.ovpn &Now you have to enter Username and Password. That should be the case with most VPN providers.

It’s OK for a test but you can’t connect automatically like that. If you want to do that, you need a file e.g. auth.txt. It hast to be in the same directory as the ovpn file.
The first line holds the Username and the second line is the Password!
Then enter or modify the following line in your ovpn file: auth-user-pass auth.txt
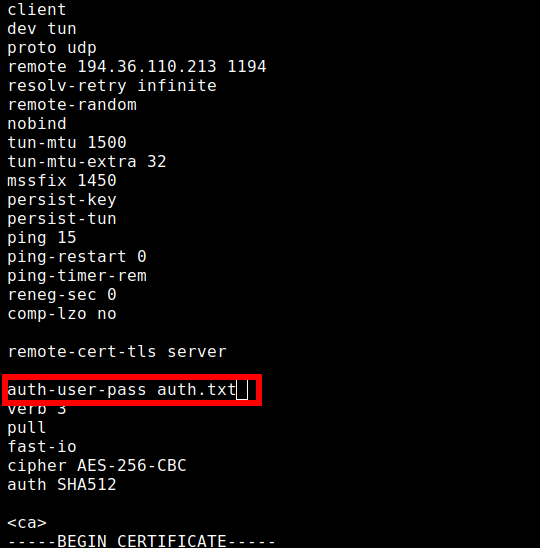
If you use the OpenVPN command from above again, your system automatically logs on to the VPN server. Now you can also automate the process.
Be careful! DNS leak!
However, you will continue to use the DNS servers of the hotspot. If you have not changed them, they are the 1.1.1.1 (Cloudflare) and 8.8.8.8 (Google) defined by RaspAP. You can find them in the file /etc/dhcpcd.conf. The static IP address of wlan0 is stored there as well by the way.
This is basically a DNS leak. With my solution and the client of NordVPN I also use the DNS servers of the VPN provider and therefore my DNS queries are anonymous.
Of course, you can also solve this differently. Maybe you have a Pi-hole in the network anyway and use it as DNS server. There are many possibilities here, including FreeDNS. I just wanted to point out the potential DNS leak here.
In the DHCP configuration of your RaspAP you can also define what DNS servers the clients should get. Use the DNS servers of NordVPN to avoid leaks: 103.86.96.100 and 103.86.99.100
Does that also work with NordLynx (WireGuard)?
If you have installed a current client, NordLynx also has a uniform network interface. It is called nordlynx. Here is a screenshot:

Now I can make the corresponding routing entries. WireGuard is slightly faster than OpenVPN and it’s your decision what you want to use. The solution with OpenVPN as VPN router works very well and that is not a slow either.
However, the solution for the network interface nordlynx for iptables looks like this:
sudo iptables -t nat -A POSTROUTING -o nordlynx -j MASQUERADE
sudo iptables -A FORWARD -i nordlynx -o wlan0 -m state --state RELATED,ESTABLISHED -j ACCEPT
sudo iptables -A FORWARD -i wlan0 -o nordlynx -j ACCEPT
Would you like to make your own VPN router now? It’s really not difficult and NordVPN is a good partner for it.
As I said, most reputable VPN providers should provide the resources for your project. I like NordVPN because I can use the command line client under Linux. But the provider also provides a great Android client. It is one of the most user-friendly providers on the market.
With NordVPN you can use up to 6 devices simultaneously. Because a VPN router is allowed, your Raspberry Pi counts as 1 device, no matter how many others are connected to it.
The VPN provider also allows torrent downloads and P2P connections / file sharing.
Alun
says:This is awesome and works a treat!
I did find that I also had to enable ipv4 forwarding to allow it to work:
edit /etc/sysctl.conf and add ‘net.ipv4.ip_forward=1’ to the bottom of it, or add:
‘sudo sh -c “echo 1 > /proc/sys/net/ipv4/ip_forward”‘ to nordvpn.sh
guyfawkes
says:That’s true — IP forwarding needs to be active but the installation of RaspAP should take care of this. Strange — I didn’t have to do it.
But what you did can’t hurt either.
Alun
says:Ahhh, that’ll be the difference; sorry I didn’t use RaspAP for the AP.
I didn’t realise how much RaspAP did.
Alun
says:I think the @reboot cron job needs amending too? I logged the output of running that cronjob and I get an error that ‘pi’ doesn’t exist.
I think instead it should be
@reboot bash /home/pi/nordvpn.sh
or
@reboot shell /home/pi/nordvpn.sh
or perhaps even just
@reboot /home/pi/nordvpn.sh
as I believe it’s the same format as a normal cronjob, except “@reboot” replaces the time at which it would normally run (e.g. “0 2-4/2 * * *”)
guyfawkes
says:That’s a fair point because it’s a weird one because sometimes it does work … for the Raspberry Pi and Raspbian the safer method for the time being might actually be using /etc/rc.local instead of a cronjob … I’m not quite sure when it works or not … If you want to use a cronjob maybe the normal crontab would be better with a script checking if the VPN is up or not and act accordingly. Personally, I use rc.local as mentioned in the post.
But you need to be careful here. If the cronjob runs as root – you need to login with root to NordVPN (if you use that) — that login is per user and not per system.
One more thing: Is your file nordvpn.sh executable?
Alun
says:Ah of course, yeah I guess. I just thought it actually looked a little cleaner using the cronjob method, but you’re right it’s probably safer to SU as pi and run it that way.
I might switch it to /etc/rc.local, but it’s working just fine using @reboot /home/pi/nordvpn.sh.
I have also updated my nordvpn.sh script to check the status of the VPN connection and only run if it’s “Disconnected”, because I had a weird issue where I would lose connection to the RPi AP every time the nordvpn-minute.sh cronjob ran (roughly every minute).
I can also see use-cases where multiple users might actually be useful, so I’ll keep that in mind when using either method.
Yes, nordvpn.sh is executable, and works adding
@reboot /home/pi/nordvpn.sh
to the crontab.
NH
says:Now the network interface is always called nordlynx just like it is tun0 with OpenVPN
guyfawkes
says:Thanks — yes they must have changed it. I updated the post.
AG
says:Hi!
Thanks, this post was very interesting. I have a question, how would you configure two different countries in an easy way? Even from a simple command line or script, how would you quickly change the country selected with nordvpn, without loosing access to the wifi hotspot?
guyfawkes
says:The network of the hotspot is different to the one of the gateway to the internet. Once you are logged in to the Raspberry Pi you can change the country by simply executing the command:
nordvpn c your_new_country
that should do the trick – works for me that way. Even if the country of the VPN changes it doesn’t affect the network of the hotspot.
AG
says:thanks for the quick reply! After executing the command with the new country, I get an error message trying to connect to the hotspot…impossible to get an IP address…I guess I need to check the iptables again…
guyfawkes
says:That might be the case that NordVPN sets the iptables rules again … I forgot about that as I let a little script run that checks every minute if the rules need to be adjusted. You could also write a small script that every time you change the country the iptables will be updated accordingly.
I should actually try if this is still necessary if I add the subnet of the hotspot to the whitelist. Whitelist support is possible for a few versions.
It took me a bit to fine tune the VPN router to my liking I have to admit. But after I have it like I want to it is running perfectly ever since. 🙂
AG
says:yes, indeed. I am not running the script every minute (I’ve not implemented that part yet). If I execute the commands related to the iptables it works. I will write a small script.
Let me know if the other method with the subnet works… 🙂
One last thing, is it ok to leave the raspberry always on (in my case pi4), with the hotspot active, with no fan? The temperature is fine for now…
Thanks!
guyfawkes
says:I have it always on and it seems to run fine and stable for weeks. I don’t have a fan on the Pi4 but I glued heat sinks onto CPU and GPU. They are cheap (Amazon) and seem to do the trick. I can’t say if the Pi4 runs hot acting as a VPN router without heat sinks – I just know that it is running fine with heat sinks. 🙂
Fun fact: The Raspberry Pi Foundation found out that the Pi4 runs cooler if it’s standing on the side.
guyfawkes
says:btw: I also did some experiments with NordLynx instead of OpenVPN. So in case you want to look into that. I don’t know the reason yet but sometimes the network interface facing the internet looses the connection completely. I have another script for that checking with a ping if address XYZ is still reachable and if not – restart the Pi (so far only a restart seems to help).
I have the feeling that mainly happens if the Pi is idle for too long (at night). But I haven’t got any evidence yet. It might be a bug in the client itself that will be solved in the future – who knows. The great thing about Linux is that we can tweak it exactly like we want to.
winsall
says:Hi,
I wonder if you ever figured out why the network interface stops working after awhile. Or more importantly, did you ever figure out a way to resolve it without rebooting? If not, can you share the ping and reboot script you implemented? I am a little rusty on my grep/awk skills. Thanks for sharing!
guyfawkes
says:ping -c1 192.168.1.1 | grep received | awk ‘{print $4}’
output is 0 or 1 (change ip address obviously) – if 0 …
guyfawkes
says:I know it’s not pretty but it is working. You can try in a script with things like:
1. if [[ $(/usr/bin/sudo /usr/sbin/iptables -S | grep -- "-A FORWARD -i tun0 -o wlan0 -m state --state RELATED,ESTABLISHED -j ACCEPT") ]]; then2.echo "nothing to do"
3. else
4. /usr/bin/sudo /usr/sbin/iptables -A FORWARD -i tun0 -o wlan0 -m state --state RELATED,ESTABLISHED -j ACCEPT
5. /usr/bin/sudo /usr/sbin/iptables -t nat -A POSTROUTING -o tun0 -j MASQUERADE
6. fi
SC
says:Hi – thanks for all of this – very helpful indeed. I just wanted to add that I’m having trouble with rfkill, which is blocking the wifi. It can be turned off with: rfkill unblock all. However, as a noob, I’m unsure of how to get this command to run on startup. Suggestions welcome.
guyfawkes
says:On the Pi you need rfkill? I don’t …
But to answer your question: in Raspbian rfkill can be found here (which rfkill): /usr/sbin/rfkill
As the file /etc/rc.local is still used in Raspbian Buster. All commands in there will be executed when the system starts. You can add your command with full path
/usr/sbin/rfkill unblock all
just before the exit 0
Does that help?
PB
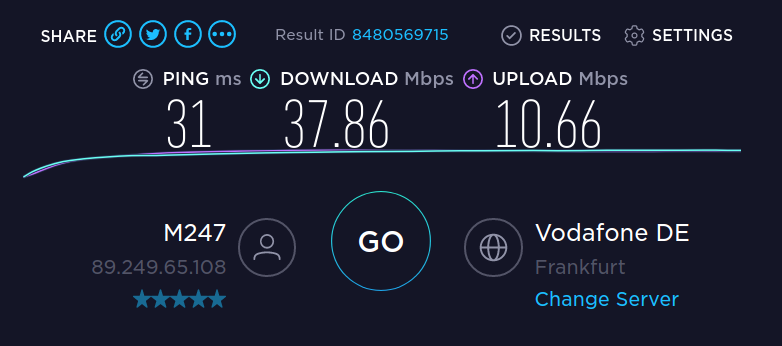
says:Great tutorial, thanks! Functionally this is working great, but I have noticed that my NordVPN speeds are slower when compared to using the Windows or Android apps.
Normally I get around 45 down/18 up. If I run speedtest-cli with NordVPN off, I achieve these speeds. But when I connect to my nearest server, I only get about 15 down/10 up. It’s not a server issue, because if I connect to the same server on Windows or Android via their apps then I still achieve close to full speeds. Settings are all at default – any idea what’s going on here?
guyfawkes
says:May I ask what Raspberry Pi you are using? There is a certain computing power involved … another thing: have you tried to run the router with NordLynx instead of OpenVPN?
PB
says:This is on a 3B+ so I don’t think it’s a hardware issue. I’ve tried switching between NordLynx/OpenVPN and UDP/TCP to no avail
PB
says:Actually I think I hadn’t configured NordLynx properly – now I am getting about 25 down/10 up. So it has improved but still not running at full speed. I’m intrigued to understand why, but functionally the AP is working well with enough bandwidth to stream smoothly. Thanks
guyfawkes
says:I mean to put it really to a test and if you have the possibility – use the setup on a much faster machine … this way it can be ruled out that the Pi is the culprit.
Ejoo Pasco
says:I successfully installed this on a raspi 4 2GB. With nordlynx I get the full internet bandwith of 90 MBit/s. With OpenVpn it is about 33 MBit/s. So it is absolutely worth it!
Dries Van der Auwermeulen
says:Hi,
I got it to work nicely but i noticed that after a while i cannot connect to my hotspot anymore, so i have to reboot my Pi to get it working again and then it does work fine.
Something i did wrong perhaps? The model of my Pi is the 3B.
guyfawkes
says:A remote diagnosis with the given information is unfortunately not possible. Maybe try to find out via the log files what happens … I use a Pi 4 now for that setup and also have used it on a Pi 3B+ – but a Pi 3B should do just fine.
Good luck finding the culprit!
Brad K
says:Thank you very much for posting this tutorial!
Everything is working well, but I would like to throw a wrench into the setup. I have a usb WiFi adapter and would like to receive internet wirelessly rather than use a wired LAN. I’ve already created a fully wireless WiFi extender/bridge with this setup, but have difficulty tunneling through the VPN. I’m quite a novice, but believe I need to modify tun0 and tell it to route my wlan0 through tun0 out to wlan1. Not sure how to do this? Any help would be greatly appreciated.
Thanks!
guyfawkes
says:It shouldn’t matter if you use a wired connection or a wireless one. Which one is used as the Wi-Fi hotspot? The USB Wi-Fi or the internal wireless network card?
If you use the USB Wi-Fi adapter as the hotspot you need to tell iptables that communication is OK after you established the connection. NordVPN will tell the firewall to cut that – so you have to reopen it.
Brad
says:Hi guyfawkes,
Thanks for the reply. I’m using the internal wireless network card as the hotspot. When ethernet cable is plugged in and NordVPN is running with the iptable rules outlined in your article, traffic is routed through the VPN tunnel correctly.
When I disconnect the ethernet cable and reboot without running NordVPN or iptable rules, then the pi acts as a wifi extender. Once I enable NordVPN and iptable rules, I can no longer connect to the pi.
guyfawkes
says:Unfortunately, it is really hard to say from remote where the problem is. “Acts as a WiFi extender” … so the USB WiFi card is not a client of the router? That would be a different setup as everything would be handled by your router that is connected to the Internet, I guess.
But it’s good to know that my scenario works without problems. 🙂
rbaoc
says:Hi, I am glad to see your instruction here. I have intended to setup Pi as VPN router, too. However, I would like to install Pi-hole as DNS server but I dont know how exactly install Pi-hole. Which interface (eth0 or wlan0 or tun0) should be selected, what should i choose the gateway and ip address?
Could you please tell me more clearly about the steps of Pi-hole installation?
Thank you in advanced.
guyfawkes
says:This is a tricky one as NordVPN uses its own DNS servers. However you could set custom DNS of NordVPN. It also depends if you want to use Pi-hole for the subnet of the hotspot or the whole network.
I considered that setup doing myself at one point but as there are too many ifs I decided to install Pi-hole on a separate Pi for the whole network and point the hotspot to that DNS resolver.
If you pile too many things on top of each other — too many things can go wrong and finding a problem could be a nightmare.
The steps for installing Pi-hole you find here: pi-hole.net